

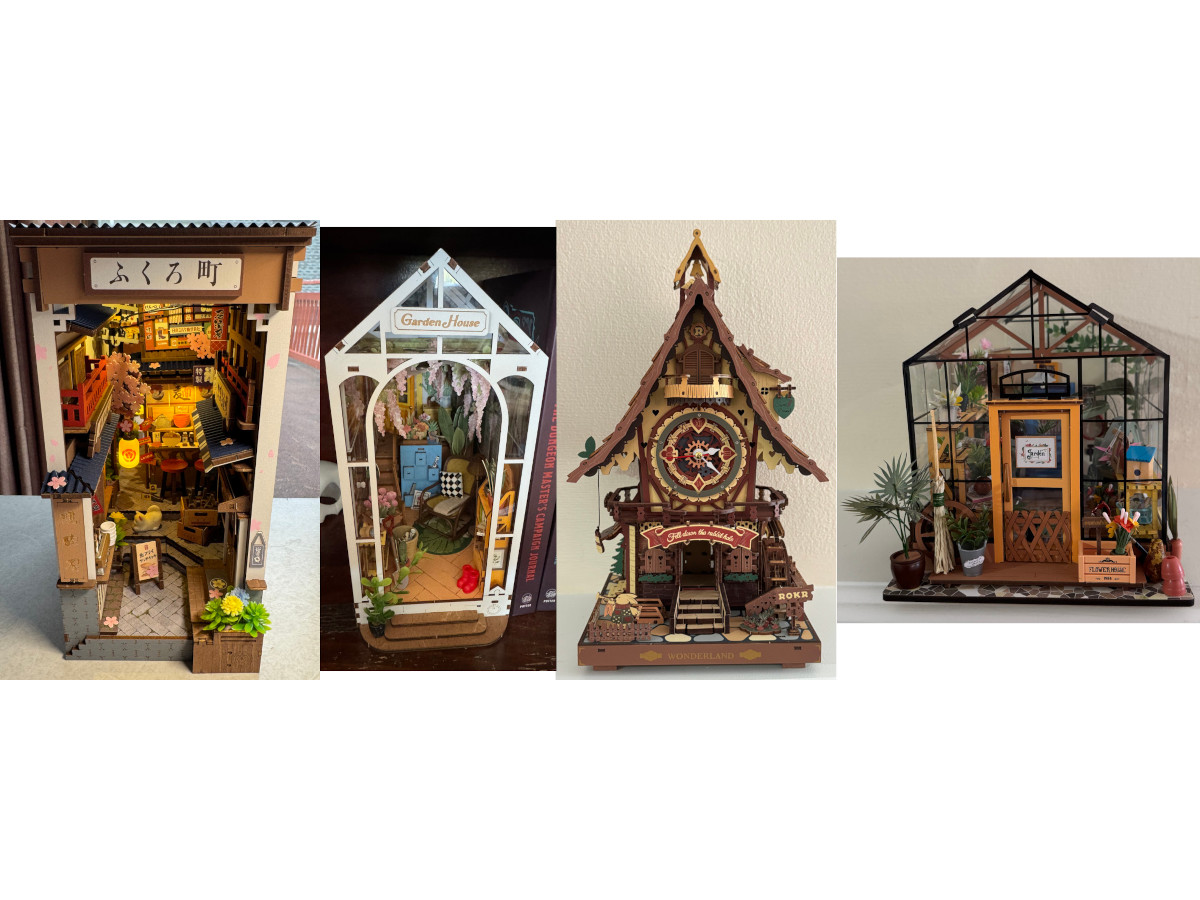
Recently, the Rolife/ROKR people sent us a few sets to build and review. My partner Rory and I had each done a small Rolife kit previously, so we mostly knew what we were getting into. But these new sets were larger and more involved, and we looked forward to the challenge.
All four of them were quite time consuming, so it’s taken us a couple of months to build them and write up our impressions. We found it much faster—more than twice as fast—to build a kit together, as one person can seek out the pieces to punch out while the other person is assembling or making sense of the instructions. It’s a lot more efficient. In the end, we each built one kit alone, one kit completely together, and one kit I did about half of alone and then pulled Rory in to help with the rest.
Sakura Wine Alley
The Sakura Wine Alley kit was my first build of these four. I loved the look of it, a quaint little back alley on my bookshelf, complete with shops, decor, lovely Sakura flowers, and even a little cat. It was a fun build, with some sturdy and some delicate pieces. I only broke one piece along the way, but I was able to glue it effectively, since I got lucky with it being located in a hidden away place.
My first impressions of the kit were pretty favorable. Though the text on the packaging and product safety instructions wasn’t well-translated, that wasn’t important to the experience. The instructions included a very handy icon illustration key, and the rest of the instructions were visual and quite clear for the most part.
One aspect was confusing to me at first, however: when they’d label a partially finished portion with a letter, without any indication of what that letter meant. But Rory figured out that the instructions just meant to set that portion aside and bring it back in when the instructions called out that letter again later.
The box for the kit was much bigger than it needed to be, but it included sections in the plastic insert that made it easier to organize loose pieces. Still, I used some of my own plastic bins for ease of organization.
This set included a large number of wood sheets of pieces to punch out (which you should absolutely not do it in advance, only punching them out as you need them). Each sheet is a different thickness, with some as thin plywood and some more as thicker, MDF type material. The thicker sheets took more force to punch the pieces out of, but the thinner ones were more likely to break. Plus there were paper items and stickers, along with some plastic plants and other items. You needed to decide how much force to use depending on which material you were working with, both in the punching out, and in the connecting together.
The visual assembly were clear about what you needed to do, but, because these are natural materials cut on machines, sometimes Tab A and Slot B took a lot of force to unite. It helped a lot to work on a hard, flat surface so you can push down evenly on some of the connections. This was equally important for both thin, delicate connections and sturdier ones that took a lot of force.
You really must be good with manipulating very small items and have great attention to detail to put this kit together correctly. Having a reasonable fingernail length helped me immensely, as I was able to put some point force on pieces to punch them out or fit them together. Plus, my fingernails helped me pick up and hold tiny pieces.
The farther the build went, though, the harder it was to assemble. This kit has a lot of delicate features that made it hard to know where to push to make pieces snap together without ruining any of the already-built parts.
The only place I ran into a legitimate problem, though, was hooking up the electrical system. This isn’t a “plug it in” kind of kit. You’re dealing with coated wires with bare ends that you need to connect up and fasten with electrical tape. They only provide a small amount of electrical tape, and definitely not enough extra if you do something wrong (which I did). And at least one of the wires wasn’t quite long enough to reach the other wires it needed to connect to, which made for a challenging problem. I had to pull Rory in on this one, because more than two hands were needed to keep everything taut while taping it all up. I ended up having to pull out my own electrical tape to tape the wires to the underside of the build, which is left exposed if you lift it up and look.
The kit lights up in three places. You can turn the lights on and off just like a touch lamp by tapping a spot on the front of the kit. Or, you can turn it completely off on the battery pack on the back.
In the end, I was really pleased with how the Sakura Wine Alley kit looked. It took a lot longer to put together than I thought it would, though. It doesn’t look that complicated, but hunting down the proper pieces, doing things step by step, doing it by myself, and having a busy schedule made it take a couple of weeks to assemble.
The Rolife Sakura Wine Alley retails for $49.99.
Garden House
My partner Rory tagged in for this build, the Garden House bookshelf kit. He loves plants and greenhouses, so I thought it would be a good fit. Here are his thoughts.
The Pieces
He found the laser-cut pieces could be fragile if they were particularly dry, which could be an issue with his tremor, unless he was having a good day with it. But the kit included a generous number of spare pieces for the smallest and most fragile of them. He found that the variety of piece types—with some printed, some as stickers, and some as paper that required sticky tape to attach with—didn’t seem to add much to the overall look, and just made assembly more difficult.
The Building Process
Rory found that the instruction manual would sometimes give instructions that conflicted with later illustrated steps, or were impossible to build with the elements called for. But he found that just ignoring the specific instructions and instead looking ahead at later photos could give him a good idea of how the pieces should go together.
Despite this issue, at least the sheets and pieces were clearly labeled and were easy to identify. One or two pieces from the zip-top bags took careful inspection to identify, but that seemed to be a common experience among these sets.
He felt that many of the connections were really clever, with layers of connections or decorations covering awkward assembly pieces to create a finished look. I also found this to be true in the Sakura set, especially.
For many of the decorative elements, there is an etched design to show you where to place the element, such as a circle on the floor for a rug sticker. This means that there isn’t room for customization, to change the location of these elements, if you prefer to change up the look of the finished kit. Also, if you make a mistake with placement, the etched markings are easily visible. He also found that the standing lamp was a bit limp, and tended to lilt to one side if you don’t periodically tighten the wire from below.
Rory found the electrical work to not be intuitive and thought it required some outside knowledge to successfully complete. I would agree—if you’ve had zero experience with any kind of electric or electronic circuit, the electrical work may be intimidating. But if you know the basics of electrical wires, it’s not too bad.
Overall Design and Execution
When it’s completed, the open front door on this kit allows you to be able to reach in and adjust elements that may shift. Unfortunately, all the tiny choking hazards inside can fall out through that door, or be accessed by children or pets.
Also, there is an operational window on the left side, which means you have to choose between putting the completed build between books (with 3D elements sticking out) or put this set next to an open space in order to see the window, which is the less attractive of the two sides (see photos).
The bottom/underside of the finished build is left open, with no cover around the wires, just like in the Sakura set, but at least in this set they are pinned in place instead of taped, so they aren’t flopping around everywhere.
Summary
All in all, Rory enjoyed the build, and especially loves the effect of the lights, and the overall visual effect on the shelf after it’s complete. He says it feels cozy and warm, and one of our cats also keeps trying to get inside, perhaps due to the dangling wisteria plants that move when there’s a room breeze.
But he did wish it were more customizable, with different style or decoration options, or the ability to make some choices in arrangement. He found the overall experience fun, but there were stressful steps involving the electrical components, because of his lack of experience. He did really enjoy being surprised by clever connections and designs, however. He said he would happily build more of these types of kits.
The Rolife Garden House retails for $46.99.
Cuckoo Clock
The ROKR Cuckoo Clock was the only ROKR set we built. It had a lot in common with the Rolife kits, but it seemed a little more robust. It also had a distinct lack of sticky tape.
One nice feature of this kit was that many of the pieces were labeled with their letter/number combination actually on the piece, in addition to being labeled next to them. This was really helpful. Also, many more pieces in this kit had extra pieces than in the other kits, in case they got lost or broken.
For this build, you start by connecting and testing the motor, clock mechanism, and cuckoo bird. It was a little tricky to piece that all together, but the instructions were clear enough, and it worked well in the end. You’re meant to set the cuckoo to chime on the hour, but it’s difficult to get exactly perfect. Ours ended up set to three minutes after the hour, and that’s good enough for us. But it’s worth taking the time to set up and troubleshoot the cuckoo to your own standards before moving on.
This set came with quite a stack of pieces to punch out; in fact, most of the pieces were on the wood sheets. The few other pieces were the motor, clock pieces, and cuckoo bird parts. Many of the pieces to punch out were very small, so be sure to build this one on a tray or somewhere where flying pieces won’t go astray or be stolen by a cat.
Some of the pieces go together easily, some with just a little force, but some require a lot of strength to the point you think you’re going to break it. This is probably affected by humidity and such, but some of it seemed on purpose, for structural integrity.
One of the few issues we found that I would change with this kit is that some pieces with the same number are mirror images of each other, in a way that matters. In other kits, mirror image pieces were given different numbers, making it clearer which pieces to use. But even weirder is that sometimes the mirror image pieces in this kit had different numbers, or an “a” or “b” appended on. There wasn’t consistency, which kept us on our toes.
There was also a pair of pegs that went on the underside of the build that wouldn’t fit through the designated holes. We had to shave some material off of the pegs for them to fit.
We found that the closer we got to the end of the build, the more loose pieces we had that had become dislodged at an earlier step, and some of those pieces weren’t individually labeled. But the diagrams were helpful for sorting that out.
At the end, we were both delighted to find that the kit’s lighting was turned off and on by gently pulling on a hanging light bulb. I don’t know why it didn’t occur to us as we were building it that that was what it would be used for. But it makes for a clever and easy off/on switch. Similarly, you can easily turn on and off the cuckoo by pressing on one of the front steps. This doesn’t affect the clock mechanism itself.
We were also happy that they made an effort to make sure the back and sides of the build were just as detailed and pretty as the front. Though it sits on our mantel, it would look great in a location where you could see all sides of the clock.
I enjoyed this build more than the others, perhaps because I like cuckoo clocks, perhaps because it’s so darn cute, perhaps because Rory and I built this one together, start to finish. But it’s a useful item in addition to being cute, and it keeps very good time. We’ve been running the clock for a few weeks and it hasn’t run slowly or fast. The clock is currently in our bedroom, so we have turned off the bird for now. It does still tick fairly loudly, but even my light sleeping isn’t bothered by it.
The ROKR Cuckoo Clock retails for $69.99.
Cathy’s Flower House
Cathy’s Flower House was our last build of the four. It started out fairly similarly to the other sets, with some floor and wall construction, with a few sticky-taped-on decorations. But then you set that foundation aside and dig into the countless little objects to fill the Flower House, and don’t pick up the foundation again until the very end of the instructions when you’re putting all the objects in place. This one is less of a structural build and more of a “populate a cube with interesting items” type.
The instructions walk you through building one little object after another, from bunches of house plants (so many house plants) to gardening supplies to bags and boxes, plus a few shelves and other quick pieces of furniture. The plants are very fussy and take up a great deal of time. I found them to be the least enjoyable part of the build, and ended up jumping ahead to work on other items to break up the plant monotony. Eventually I brought Rory in on the build, as I found myself dreading it, and that sped up he process considerably.
Observations: Good
The kit includes a very handy identification sheet to help you identify some of the parts that aren’t labeled, especially those stored loose in bags. The included sticky tape is quite sticky (as it is in other sets), and works quite well for wood, plastic, and paper, assuming you have a large enough surface to work with. I thought that folding the books and book covers would be a challenge, but the paper for them was pre-scored, so they folded in the correct place automatically. Easy!
Observations: Bad
I had a lot of complaints about this set while I was building it. Some of the pieces were so thin that it was hard to keep them from breaking, especially along the wood grain. I had more than one piece break or partially break, and I had to glue them back together. This was an issue with all of the sets, but this one was a little trickier than the others. One of the types of plastic plant was coated in some kind of wax, so the sticky tape didn’t stick to it at all. The sticky tape also didn’t stick to the included fake grass. These issues should have been something they’d anticipated. On the other end of things, the way many of the plants are constructed requires having permanently-exposed sticky tape, which makes it hard to keep plant stems from sticking to each other.
Some of the instructions with the plants and other objects seem to be missing some middle steps, so sometimes we just had to do our best, creating something that looked like the final photo. I do recommend reading all steps for each object before beginning that object, but the instructions do seem to get more sparse as you go through the overall build. I didn’t find this to be the case with the other sets.
Most of the plant pots were not bottom-heavy or very stable, often with incredibly small or narrow bases. Even with plenty of sticky tape on the bottom, that wasn’t enough to confidently hold them in place, especially if the center of gravity of the plant is at all off-center, which is too easy to have happen.
As we experienced, if something falls over after you get the whole house closed up, it’s hard to fix, as it’s not erally meant to be opened up again once you get the “glass” in place.
Observations: Neutral
In our set, one of the very thin sheets of paper plant material ended up goobered up somehow, but, in the end, that surprisingly didn’t affect the look of the plant you’re meant to make out of it. Quite a few of the elements in this kit are on very thin paper, and, for a few of them, they do give you extras in case you tear one.
Some of the flat paper plant leaves look very similar, so it’s important to compare photos. There were so many plants that you want to be sure to be doing the correct things with the correct sets of leaves.
For the plastic plants, you must be careful to cut them in the correct places to create the desired look, as you might need to maintain a stem or save enough of the plant for another step. Additionally, triple-checking the instruction photos is important, since some of the plastic plants look very similar.
You’re on your own with this set about sticky tape. On the Sakura set, the instructions told you exactly what size of sticky tape to use (it comes in small, medium, and large) each time you needed to use it. But, with this set, it just said to use the sticky tape, and you got to decide how much to use. Then you had to hope you had enough for the whole kit. I used sufficient sticky tape for most things and still had plenty left over, but that was with cutting a lot of pieces of tape down to size, and having to be creative with some of its use. In general, the sticky tape does do a lot of the heavy lifting in this build, as that’s how most of the things are held in place.
Finishing the Set
After building and collecting the items to populate the Flower House with, you start placing them all inside, finishing the base, adding the lights and battery pack, and enclosing the whole thing in “glass” (really, a plastic representation of a glass greenhouse).
The end effect is pretty nice, especially all lit up, but so many of the plant pots have very small bases and wild leaves that we wrestled with them falling over, and one finally escaped its shelf after we got it all sealed up. So it lives on the floor now.
Of all four of these kits, Cathy’s Flower House was easily my least favorite build, but I prefer assembling structures to carefully placing sticky tape on wire and hoping your leaf sticks to it (and not having the wires stick to each other, which happened a lot too). But if you prefer having small, fiddly pieces to build, this would be a great set for you.
Rolife’s Cathy’s Flower House retails for $41.99.
Final Observations for Rolife and ROKR Sets
Each one of these Rolife and ROKR kits has some things in common, but building them provided four different experiences. Each one has unique challenges to figure out as you build, and different joys and pain points.
Most of these sets have a few types of pieces where the provide more than you need. They are marked as to whether a piece type has extras, but not how many extras there are. So you have to hope you don’t lose or break more than one of them, just in case.
The first of these kits that you build will almost always be the hardest, since you’re learning how these types of kits work, how careful you need to be punching things out, and different ways pieces can go together. You get a feel for some of the challenges unique to this kind of building. We had each previously done smaller Rolife kits, so we were already oriented about what would be required of us, but we still learned a lot more as we went along.
In the end, the Rolife and ROKR kits are worth getting and building for patient, careful builders who are good with small pieces. I recommend picking the one or ones that you would like sitting around in your house for you to look at. Pay attention to which ones light up and how they light up, and how compatible they are with your house (little children, pets, etc.).
You can find Rolife and ROKR sets of all sizes and at all price points on their websites or on Amazon.
Note: We received kits for review purposes, but all opinions are our own.


