This month, we have tried a couple of upcycled plastic ideas, including small “stained glass” style potted plants and homemade shrink art.
For this final upcycled plastic DIY of the season, we will use more than one item that seems to be more plentiful around the holiday season to make little winter snow globes.
First, we will need some nice, clean clear plastic sheets, which you should already have plenty of set aside. Next, some corrugated cardboard. With presents being sent from family, or those online orders coming in, these are likely stacking up as well. Finally, some holiday or Christmas magazines or catalogs. These also shouldn’t be hard to find.

This craft is all about the layers. Think of it like Photoshop or digital editing except with scissors and paper.
Start with a template you can trace—a glass, candleholder, cookie cutter, or another small item with a good, simple shape.
Make three tracings on a piece of cardboard, then one on a piece of clear plastic. Cut them all out. You now have four identical pieces.
On two of the cardboard pieces, use a utility or hobby knife life to cut out the center. If you have a round shape, the result should look like a big ring. Be careful with this part when working with younger crafters or do it yourself. Everything else will just need plain scissors.
Now, look through your catalogs or magazines to find some nice images. Cool woodland images, Christmas villages, or cityscapes look cool, but really you can use whatever images you like.
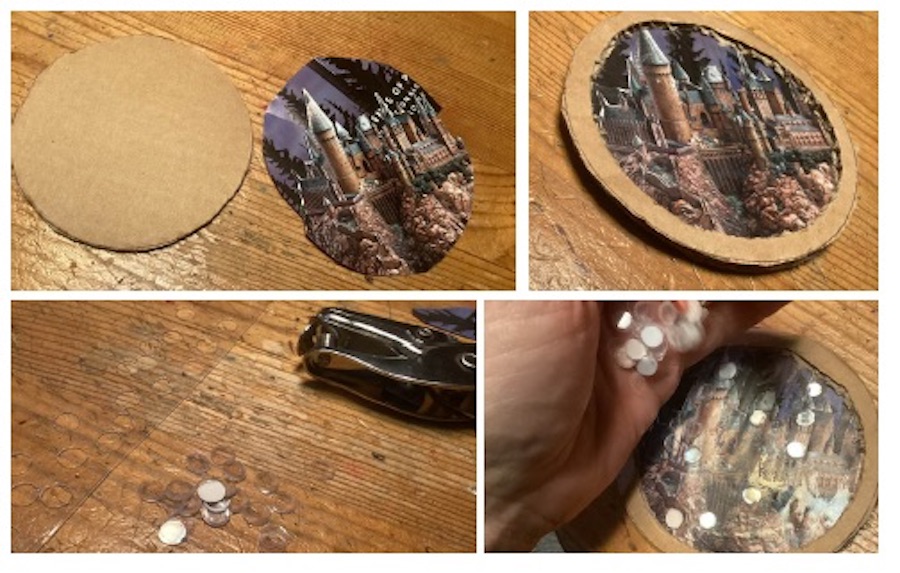
Find your template and trace another identical piece on the image you want, cut it out, and glue it on the piece of cardboard. You can use just one full image or make a collage with more than one. Cover with some decoupage paint and let it dry.
Glue one of the pieces of cardboard with the cutout center over the top.
Now, make some “snow” with additional clear plastic. Don’t use the shape you already cut. Decide if you want it to be clear or colored with a marker or translucent paint. Both ways look nice. If the plastic is thin enough, you can use a hole punch. If not, just cut out little irregular pieces with scissors.
Pour a small handful of the “snow” into the pieces of the already constructed snow globe. Don’t fill it entirely, just a little less than half is fine.

That leaves one piece of cut-out plastic and one last piece of cardboard. On the plastic, glue some more catalog or magazine images along the bottom. Make sure to glue the part you want visible directly to the plastic sheet. Lightly hit this bottom part with more decoupage glue to keep the edges in place. Glue the sheet of plastic to the already constructed parts of the snow globe, then glue the final piece of cardboard over the top.
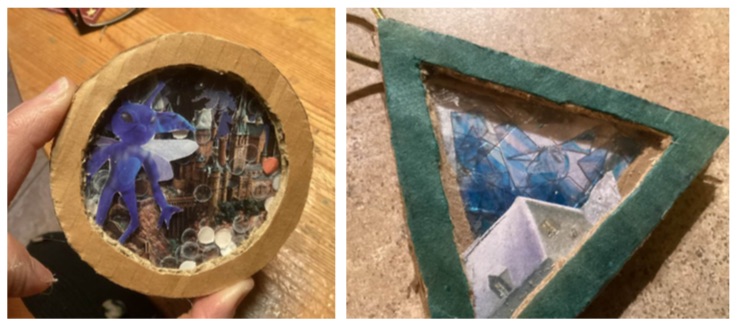
The snow globe construction is finished, you just need to paint or decorate the front edges however you want. Once finished, you can glue a ribbon to the back to make a tree or hanging ornament. These are lightweight, so you can easily attach a magnet or sticker to the back. Use these to decorate presents or to make your own greeting card designs.

I hope these holiday and Christmas crafts helped you unclutter a little this season, but, mostly, I hope they gave you and your kids a chance to get creative and cool during this festive time.