

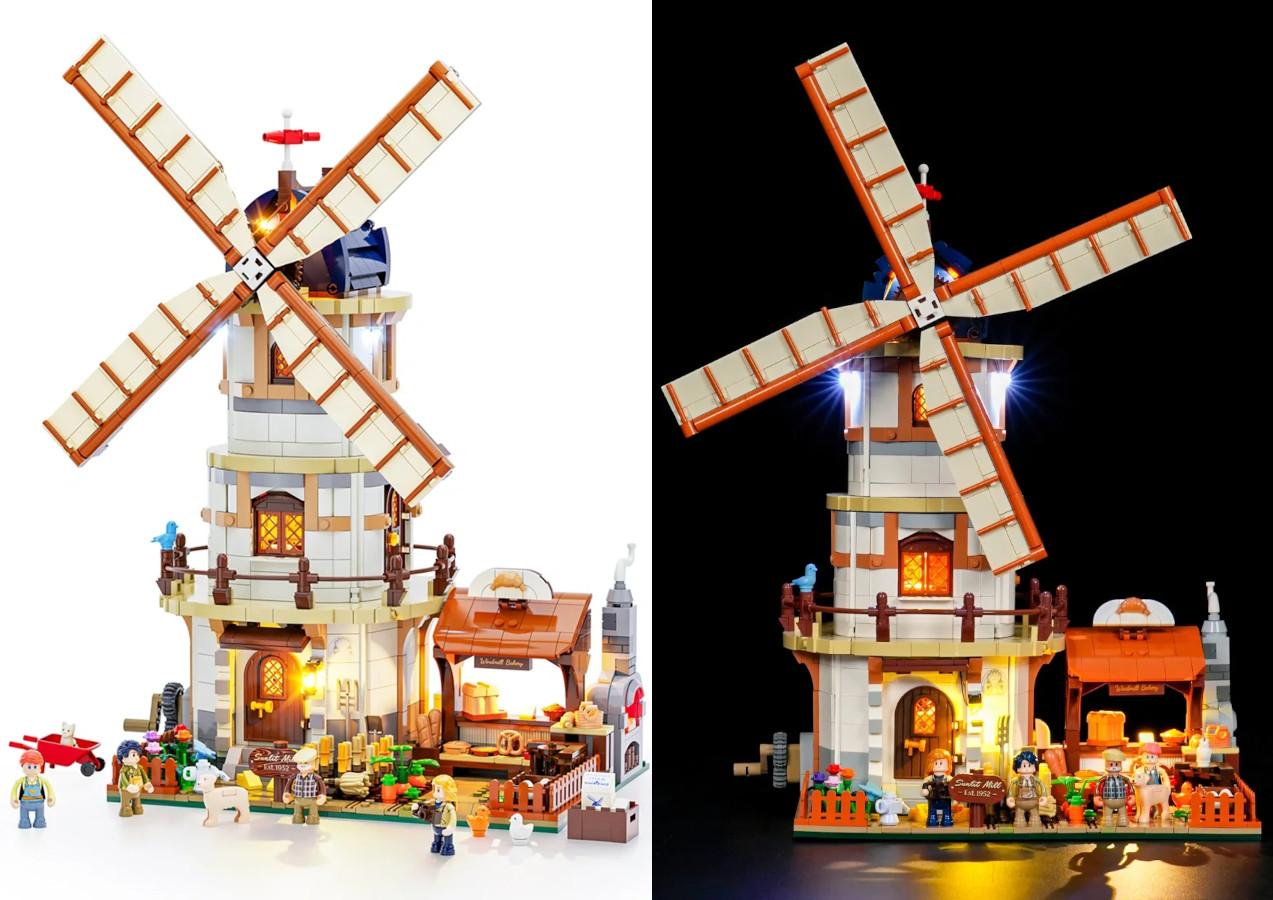
I’ve built my share of toy brick structures in my day, from my freeform childhood in the 1970s up to the more kit-oriented present. But other than a few Nanoblock sets—which are tiny, infuriating, and fun—the rest were from a certain Danish company. I’d never had the opportunity to try sets from other brands out there, until Lumibricks asked if we’d try out some sets here at GeekMom. And, since I have a great love of building things exactly according to directions, I was happy to take them up on the offer.
Lumibricks seems to aim their offerings more to adult enthusiasts, since their sets include lighting systems that add elements of electricity and sometimes-tricky wire connections to the build process. Their sets aim to tell a story, with plenty of theme areas to choose from, with prices ranging from about $25 to $200. Their themes range from Cyberpunk Neoncity to Town Life to The Old West to Middle Ages to Farm Life and more.
The company focuses a lot on building a community of enthusiasts, and leans hard into sets that light up (thus their name). Their tagline seems to be “Delight Day And Night”, providing something interesting to do or look at in the set regardless of whether the lights are on or off. You can check out their About Us section or the Lumibricks FAQ to learn more about the company, and you can check out their whole line of products.
My reviews of the company’s offerings will strive to highlight what the building and play experience is like, through my honest impressions, good, not so good, and neutral. Because I have so much experience with another brand’s sets, it’s inevitable that my impressions will often be in comparison to the other company’s offerings, but hopefully that will help our readers calibrate their expectations.
The Lumibricks Dutch Windmill Millhouse is a substantial set, much like most of the Lumibricks sets. There are 2297 pieces, and it retails for $99.99, which is about half the price as I’d normally expect for a set that size. In my house, we’ve always had a 10 cents per brick guideline for what might be a good value, and this one is less than 5 cents per brick, even with the specialized pieces, figures, and lighting system.
The set leans heavily into the warmth and whimsy of a traditional rural Dutch homestead, with plenty of Dutch details to discover and delight. It’s a “working” windmill, so you can turn the crank and rotate the sails. And there are so many details to discover as you slowly build it, or as you later browse the different areas of the set.
First Impressions
The set’s box is very solidly built, and the flap tucks close, making it easy to pack away the parts you haven’t used yet, keeping them safe from kids, cats, or spoilers. There are two sturdy building manuals. There is also a Service card tucked into one of the manuals, so it stays flat. The card tells you how to order replacement parts and how to join a Lumibricks group, through QR codes.
The front of the first manual does include some words, in many different languages. First, it tells a bit of a story relating to the set. Then, there are safety messages. The rest of the manuals clearly display visual building instructions without words, in slightly different ways than I’m used to, but no less clear.
The set includes clearly numbered bags, making each section of the build easy to do in one sitting. Most numbers include three bags, with one number only having two. There were also two specialized bags, one with some pieces such as keys and plant leaves, and the other with very specific electric cable management pieces. The set also includes a small box containing the lighting kit, which includes the battery case, lighting bricks and wires, a USB connector, a screwdriver for removing the back of the battery compartment, and some decent rounded tweezers that I can’t wait to use in my other arts and crafts. The set has 11 lighted elements.
Getting Started
The first thing the manual has you do is test out the lighting objects to make sure they work. The removable panel on the battery case is a challenge to remove, but I managed it with some force. But the wire connectors are fairly straightforward, even for a first-timer, though they are very small. No instructions were given for how or when to use the tweezers, but my guess is they are meant to be used to facilitate plugging in the connectors. Unusually, they left you to guess about this one, and using a metal object to plug in an electrical connection seems weird. I found it easier to use my hands anyway. All my lights worked fine, so I didn’t need to refer to the included troubleshooting guide. There were also instructions for how to use the included brick separator.
Next, they have you build the included human figures, which were totally disassembled. The set includes four figures, including hair/hat, head, torso, arms, hands, and legs for each. The legs are marked L and R, but it’s a bit unclear from the diagrams which way the arms should bend and the hands should be oriented, since they are not symmetrical. I took a guess and still have no idea if I did them correctly. Perhaps my figures have backward arms and hands? The hands are very tiny, though, so if you haven’t already set out a building tray or a series of bowls to contain your pieces by this point, now would be a good time.
The plastic that the numbered bags are made out of is a bit harder to tear than expected, but I found a way to do it that didn’t involve scissors. Then I poured each bag into its own bowl, since it was clear to me that they intentionally put some pieces in specific bags. For the numbers where there were three bags, one usually contained the very smallest pieces, one the very largest, and one the medium-sized pieces. Sometimes they would separate very similar pieces of the same size into two different bags, to make it easier to tell the pieces apart, which I appreciated. Since at least half the job of assembly is finding the right pieces for each step, making the piece hunt more efficient is helpful.
The Building Experience
Most of the build went very smoothly. During the build, I did what I normally like to do and first got out all the pieces for a step, and then put them together, so I wouldn’t forget any specific pieces. Sometimes I’d gather all the pieces for a couple of steps at a time, especially of the pieces were the same or similar, making the process more efficient.
When I was done with each set of numbered bags, I would pour the extra pieces they included (usually some of the very smallest pieces since they are the easiest to lose) into an extra bowl, keeping them out of the way and making it easy to put them all in a bag at the end of the build. There ended up being a nice collection of extras, including an extra key!
In the manuals, the images highlight in red which pieces you are adding to the existing structure, making it clear where each new piece goes. Sometimes they give you handy top-down diagrams when there might be some confusion from the main viewing angle about where things go. This was usually very helpful but occasionally unnecessary.
There are a few places where I feel like they could have added an additional image for clarity, and quite a number of places where they could have combined some images for efficiency. Plus a couple of pages where I feel like a mistake was made, with a missing arrow.
Some of the brick colors are so similar that they look virtually identical in the book due to their printing process, such as the tan and moss green, and the brown, dark brown, and black. But, in these cases, they usually had a helpful “this, not that” kind of diagram to highlight the minor differences.
There are some very dark pieces, such as a very dark brown and a very dark blue, that are hard to discern in the manuals without bright lighting, because the detailing is printed on top of them in black. I found myself holding my phone’s flashlight over the page for those sections.
While running and connecting up the wiring, I did notice that you had to be really careful to not catch a wire under the cord management pieces instead of in the designated gap, when you were adding those pieces to the build. The wires were often not exactly straight, so forcing them into very narrow channels was tricky. Though I did smoosh more than one wire before getting it properly situated, it doesn’t seem to have affected the functionality of the lighting set. There also is at least one place where you’re meant to actually press a wire beneath pieces that don’t have the special cable management gaps, which was surprising. And there are plenty of locations with obvious wires showing, some of which were longer than they needed to be and couldn’t tuck in anywhere discreetly. There was also one length of wire in the bakery that was almost not long enough to get to where it needed to be. I ended up having to take that area apart and put the pieces together in a different order than instructed, to force everything into place. Since we have cats who are both prone to chewing things, I will have to be careful where I keep this windmill, since some wiring shows outside the windmill.
As I was going along on the build, I was excited to slowly discover the many pieces that have specialized printed details, such as on the millstone, wall art, signs, a bag of flour, a cheese plate, and even an album on a record player. I love how these are all printed and aren’t stickers, as they just look better, and they last longer. It helps the scene feel more genuine.
Sometimes, through the build, I couldn’t tell where a certain series of steps was heading, but after a while I just had to trust the process and know it would work out in the end, which it did most of the time. A couple of the big issues I ran into were because I accidentally put the wrong piece or wrong colored piece in place a few steps earlier, but those were easily remedied.
Some Additional Observations, Good, Bad, and Neutral
- Fine motor skills are absolutely key with this set. Shaky hands or long fingernails will make it much more challenging.
- The wooden clogs look like little taxi cabs to me, but I did eventually figure out what they were supposed to be.
- The front door clicks into place well, but if you try to open it, it comes off the door frame.
- There are handy handles on the back panels that can be removed to see inside the windmill.
- Like with other sets I’ve seen, some basic building pieces that will eventually be hidden behind other pieces are made in fun, bright colors, like orange, yellow, light blue, or green, which makes it easier when searching for those pieces and while following construction directions. I like this aspect. In at least one place in this set, though, you can see a bright color (orange, in this case) poking out from behind other pieces. I don’t think this was intentional.
- Some of the colors they chose to use were quite similar to each other, so I learned to double check that I not only had the correct shaped piece, but also the correct color, using a flashlight as needed.
- The electrical connectors don’t always give a clear “click” into place, so you don’t know if they’re fully connected until you turn on the battery pack.
- The hand crank to turn the windmill and millstone is a bit loose and wobbly, so you wouldn’t want to turn it with too much force.
- You can see where, on many of the pieces, they were filled in the mold, as there is a paler spot where it was detached.
- The tolerances for piece production isn’t as tight as I’m used to with other sets. The pieces sometimes don’t fit together as perfectly or consistently, sometimes with even the same piece combinations fitting more tightly or loosely. I don’t know if it’s a quality control issue or a lack of standardization.
- There is at least one mistake/oversight in the book in two spots, where they are missing arrows pointing to where to put an assembled combination of pieces.
- The color was off somewhat on two types of pieces that were meant to match the orange-y brown of the other main pieces. These two types of pieces were more brown and less orange, to the point where I questioned whether I had accidentally used the wrong pieces in an earlier step (I hadn’t). I wondered if they didn’t have a standard color mix for that color.
- It also felt like some of the plastic that was used for a few of the items (the wheelbarrow, the thin green plant stems, the big green leafy plant, and even the brick separator) was a lower quality plastic. The rest of the pieces seemed more like what I expected, though, and were shinier, heavier, and solidly built.
- Especially because of the tricky wires in the light kit, this probably isn’t a set that you’d want to disassemble and reassemble again later. At least we won’t. We will leave it put together.
The Completed Dutch Windmill Millhouse
They really made an effort to pick up on aspects of Dutch culture with this set. There are references to cheese, bicycles, Delft plates, fields of tulips, and more. Some of the special pieces are adorable and fun, such as the chickens (my favorites), some of the garden flowers (which are pretty but don’t look like tulips), and the food items.
The ability to turn a crank and have the windmill sails turn, as well as the millstone, is a great touch. That feature doesn’t require battery power, making it an interactive set even without digging out the battery pack and switching it on.
In the interior photos below, you can see how much of the wire was still exposed.
The whole set is warm and homey, and definitely a place I’d want to visit. I’d check out the garden and buy lots of baked goods made from the flour milled on site. I love how many detailed items there are in the bakery and garden areas, as well as details inside, such as the mill logbook, different elements of the milling process such as collecting the flour itself and baking it into different products. The set is rich with detail and potential for play.
You can power the set with the included battery case (the required 3 AAA batteries themselves are not included), or with the included USB cable and your own power bank. The included battery case fits snugly in the “basement” of the windmill (below the bottom story), but it is a challenge to get out, which will probably keep me from turning the lights off and on very often.
Conclusion
My evaluation of the Lumibricks Dutch Windmill Millhouse is mixed. The theme and details are very well done. The lighting kit does the job, and creates a very different look to the scene when ambient light is dim and you turn on the windmill lights. The set does have some very unique pieces, and it’s obvious that a great deal of thought and care was put into the design. Additionally, the value for what you pay is high, with a more affordable cost structure than other companies’ sets.
But that comes at the price of quality and consistency in a few areas. I feel like the set and instruction books could benefit from a bit more testing, a more consistent production process, and an improved quality control process. But, if those quibbles are not deal breakers for you, this Lumibricks set is a good deal. If you want an interesting toy brick set that lights up, Lumibricks produces quite a number of them for less than you’d expect to pay with other brands.
Note: I received a sample for review purposes.

