Every year during the holidays, we get a package of “Christmas Crackers” for our dinner plates. As fun as these are, they don’t offer a lot of variety in little prizes or styles.
A few years ago, we decided to make our own gifts that looked like Christmas Crackers for friends but that had a little more personality to appeal to everyone’s interests and fandoms. These ended up looking great and were a lot of fun to make for gifts.
First, cut the paper roll in to three pieces, one longer (about 6″) with two smaller pieces (about 1″ long each).
Place little “treats” inside the longer piece. One of the nice things about these is you can add cooler gifts than the ones that come in real commercial crackers, particularly if you’re theming it to go with special fandom. Little mini-figs, erasers, stickers rolls, and other small toys work, but we also add a couple of pieces of candy and replace those lame jokes with our own silly movie or book quotes or a comic strip.
Once filled, place the tube and the two ends (leaving a little space in between the main tube and two ends) on an old comic book, catalog, or magazine page or wrapping paper, then roll it up tight. Secure it with a small drop of school glue or clear tape.
Tie the open ends off with a thin ribbon or piece of yarn, and slowly push the smaller cardboard ring inside to give it that Christmas Cracker look. Place them among the other presents, hide them in a tree, or leave them on a pillow or book stand for a little extra surprise.
We also like to get creative when it comes to wearing those fragile paper crowns. Through the years, my daughters have found creative (and stylish) ways to wear these crowns, particularly as they’ve gotten older. Here are some of our favorites:
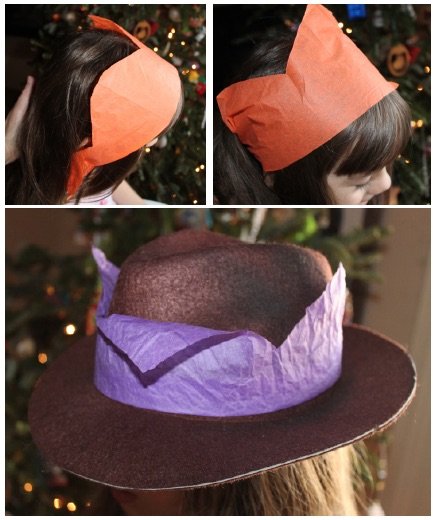
Head Wraps: For those with long or medium length hair, pull your hair through the crown (gently, without ripping it). This holds the crown in place like a headband and is less likely to fall over the eyes.
Hatbands: If you have a brimmed had, simply place the crown over the top. Sometimes we’ll fold them so they look like a plain colored hatband, but keeping the point crown tips showing is more fun.
Paper Bows: Just like working with any other tissue paper, fold the crown in half and accordion fold it into a bow. Use a pipe cleaner or rubber band to attach it to a barrette or bobby pin. This is a similar method to the bows and flowers you can make with candy wrappers. These are really easy and work well where I live on new the Mexican border, where colorful paper flowers are often part of regional holiday displays.
Paper Scarf: This is the simplest by far. Slowly rip the crown open at the glued seam, and tie it around a ponytail or a loosely around your neck. Be careful not to rip them.
Of course, this DIY doesn’t create actual crackers, as Christmas crackers have to “pop..” This was the idea of a London sweet maker named Tom Smith who was inspired by Paris bonbon sweets to wrap his own candies in pretty paper. He added his own twist by borrowing a recipe from a fireworks company to create a small popping mechanism when they are pulled open.
If we want to go full cracker, I still like to use the commercial ones, but those who want to make their own crackers can buy a kit, complete with the popping cracker “snaps” and paper crowns, through various sites like Old English Crackers.
Even if our DIY cracker presents don’t pop, they still have that fun “there’s a surprise inside” feel to them, and that can make for a fun gift anytime a little gift or surprise is needed.
This post was last modified on December 14, 2019 1:05 pm
Bring springtime and color into your home with Marimekko stationery items.
The fight between winter and the onset of spring is something we know well in…
Out today is the newest Mouse Guard book, 'Mouse Guard: Dawn of the Black Axe'—and…
If you like some extra squares in your cubes, check out the new Rubik's x…
Like many others, I jumped directly into my Apple Music Replay this year filled with…