A selection of Elmer's Slime making products. Image by Elizabeth MacAndrew.
W got a slime kit for the holidays this year from one of his aunts, and he loves it. I’ve had a lot of fun making mini batches with him and A, and the fact that slime and Play-Doh are some of the few things that they have not subjected the carpet to makes me fairly willing to enable this hobby. However, the slime kit started to run low and my online searches were unable to find another copy of the same kit, so I needed another option.
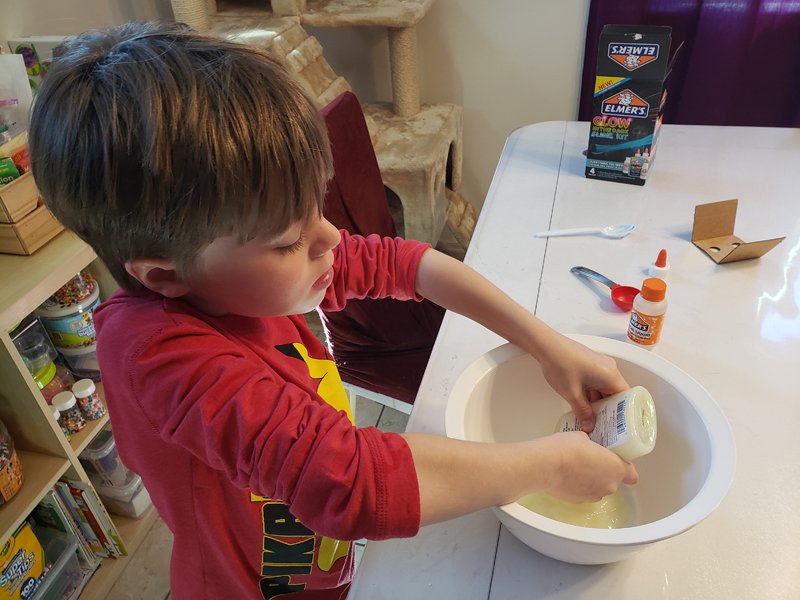
Thanks to Amazon, I discovered that Elmer’s not only provides glue for slime, but they have their own reactor as well, turning slime making into a two-ingredient process. I found the idea highly appealing. Searching down DIY slime ingredients can add up really fast once you calculate in base ingredients, something to color the slime in, and mix-ins like glitter. Yes, you can make a lot of slime with that much stuff, but if your kid gets bored with the hobby after two batches, you can easily find yourself with $30-$40 in slime supplies just sitting on your shelf. Elmer’s glue has a variety of glow colors, translucent colors, solid colors, a few color changing choices, a few metallic colors, and a whole lot of glitter colors so you don’t even have to buy mix-ins. Also, Elmer’s is a brand that is not likely going away any time soon, so I was confident I could get replacement supplies when needed.
Elmer’s sells a few kits that include everything you need to make two batches of slime (except for a container to put it in) for around $10. If your kid gets bored of slime after two batches, you’re not out a bunch of money for unused supplies either. I started with two kits, this Frosty Slime Kit and a Glow Slime Kit.
So during Spring Break, the boys and I attempted the Frosty Slime Kit.
It did not end well.
I am not certain if it was the too small bowl that started us off wrong, the fact I didn’t use a solid enough stirring implement, or the fact we put in all the reactor at once (while this kit said to do that, the others kits said to put it in a few tablespoons at a time). What resulted was a comedy of errors that soon had our hands covered in sticky, gooey slime that was not forming up and no easy way to get it off without leaving a substance trail that looked one part Elsa from Frozen and one part Slimer from Ghostbusters. We somehow managed not to slime our house too badly, but the embarrassment at being thwarted by such a supposedly simple process was a little humiliating.
I refused to surrender. We still had the Glow Slime Kit, after all.
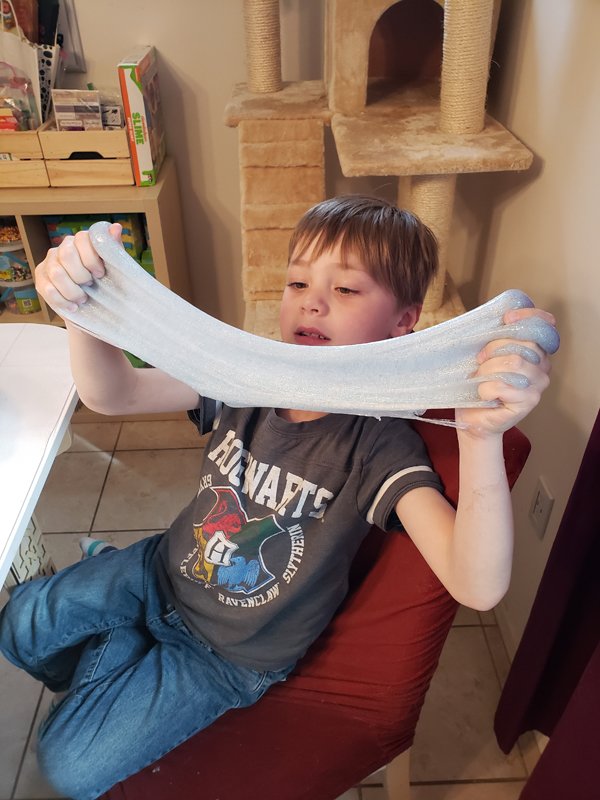
This time I pulled out large mixing bowls, rubber spatulas, and read over the directions carefully. This kit suggested putting in the reactor 2 tablespoons at a time and mixing before adding more. We also used scissors to cut open the glue bottles so we could use the spatulas to get as much glue out as possible. This time I only made one batch so I wouldn’t ruin a double batch if this went wrong. I followed the directions and noticed this batch still felt gooey, but not as bad. I began kneading and working it and did find the more I worked the slime, the more solid it got unlike our failed batch. It took some decent time (think 10-20 minutes, you do need to put some time into it), but I got it to a decent state of non-gooey and turned it over to A and started helping W make the second batch.
A likes saying that we “failed our way to success,” a phrase he picked up from Magic School Bus, and I agreed. We quickly tried some of the other slime types and found success with each attempt. I should note that since working the slime does take time, you may want to make your kids go potty before they start working the slime. Once it’s on your hands, you’re pretty much committed to working it until it’s solid enough to pull off your hands. Another thing we did notice about the slime, it will start to break down if not regularly played with, but reworking it firms it up again. It takes less time to rework it the second time, but still expect to put in a good ten minutes or so doing this, so don’t let your kids pull it out right before you need to leave the house. Please also note that it is recommended kids wash hands and play area surface after they’ve been playing with or making slime.
What about that first kit? Was the kit a failure or was it just us? Well, we did go back and try the Frosty Slime kit again after our more recent successes. This time we used the bigger bowl, spatulas, and only put in the reactor 2 tablespoons at a time, and it turned out beautifully.
Since we were on Spring Break, we later decided to hit up our local craft store and see what they had in stock as compared to Amazon. Here is what we discovered:
On another note, we found the glow glue and the solid colored glue creates generally firmer slime than the glitter and translucent. I suspect this has to do with whether standard or clear glue is used as the base (standard is more starchy). I am not sure about the metallic and color changing glues, as we only just discovered them and have not had a chance to test them out.
Is slime making a favorite hobby in your house? Have you used the Elmer’s kits? Let us know in the comments.
This post was last modified on April 14, 2019 3:23 pm
The fight between winter and the onset of spring is something we know well in…
Out today is the newest Mouse Guard book, 'Mouse Guard: Dawn of the Black Axe'—and…
If you like some extra squares in your cubes, check out the new Rubik's x…
Like many others, I jumped directly into my Apple Music Replay this year filled with…
It's time to stuff the stockings that were hung with care with our must-have stocking…