One of our favorite board game brands for kids is the German-based company HABA, and we’ve been lucky enough over the past few years to be able to review a number of their titles. It’s been a while since we’ve gotten a new HABA title in our house, but recently we got the chance to receive a review copy of HONGA.
What Is HONGA?
HONGA is a resource-gathering and points-earning game where players act as different chiefs caring for their tribes. However, as a chief, you must be careful of HONGA, a saber-tooth tiger, who will gobble up your resources if you aren’t careful. The game is aimed at 2-5 players ages 8+ and takes around 45 minutes to play. It has an MSRP of $49.99.
HONGA Components

HONGA contains the following:
- 1 Game Board
- 1 Depot Board
- 5 Player Trays
- 1 HONGA Figure
- 46 Action Disks
- 32 Barter Cards
- 25 Bonus Cards
- 1 Mammoth Tooth
- 1 Starting Player Fire Marker
- 30 Mammoths
- 5 Cavemen
- 5 Scoring Markers
- 20 Food Markers
- Instruction Booklet
One of the reasons HABA is a favorite board game brand for me is the quality of the components they make. HABA tends to use wood pieces where other companies would use plastic, and the pieces tend to be super durable and feel more like heirloom games. No wonder I remember my grandmother from Germany sent me a few HABA games as a kid, as this sort of reputation for quality tends to create long-lived companies. Size, shape, and bright colors help to differentiate the different markers types, and I really love how the Food Markers look like mini versions of the food they represent or that the Mammoths are actually Mammoth shaped.
The Boards are nice and thick and either snap together or fold up to nicely fit with a reasonably sized box that should fit on most shelves with ease. The artwork is colorful and fun, and the Boards do a nice job of using outlines to help you place components. I especially like the use of dots to indicate what spaces you do and don’t use based on the number of players in your game. The Player Trays are super thick, and I really like that it has little depressions for the markers so that a jostle doesn’t rearrange your pieces and make it impossible to remember what you were set on (a big plus for a game intended for kids).
The Actions Disks, Barter Cards, and Bonus Cards still feel sturdy enough, and I like the use of color to quickly identify which are which. The red Action Disks even feature a mammoth tooth design on them to help remind players which of the cards the player with the Mammoth Tooth will use. There’s some fun art on the Barter and Bonus Cards too, and I really appreciate that the Instruction Booklet has a guide to the symbols of the Bonus Cards.
For a game with a variety of things going on during gameplay, I will say that the Instruction Booklet makes great use of setup diagrams as well as cutting the instructions down enough that the game is still accessible to kids and pretty quick to catch onto.
Overall, I am a big fan of the game components, and if you are familiar with HABA games, you will find their reputation for quality holds up with HONGA.
How to Play HONGA
Goal
The goal of HONGA is to earn more points than the other Players. Depending on how many Players your game has, the number of points needed to trigger Game End varies. There’s a variety of ways to earn points including Bartering, Paying Homage to the Old Gods, and via certain Bonus Cards.
Setup

HONGA has a decent number of components to organize, but after one game, my kids felt like they were capable of setting it up on their own which is a good sign as far as I’m concerned. To set up HONGA, just follow these steps:
- Place the Game Board and Depot Board in the center of the table.
- Separate the Action Disks, shuffle them, and place them in their separate piles next to the Game Board.
- Shuffle the Barter Cards and place them in a face-down deck on their designated spot. Take the top three cards off the deck and place them in the designated spots.
- Shuffle the Bonus Cards and place them in a face-down deck in their designated space.
- Each Player gets a Player Tray and places a Marker for Fish, Berries, and Mushrooms on the 1 spot. A Water Marker goes on the 0 spot.
- Each Player selects a Caveman that matches the color on their Player Tray and places it on the lowest step of the Sacred Mountain.
- Each Player takes the Scoring Token matching their Player Board and places it on the Cave.
- Each Player takes the Mammoths that match their Player Board color and place them on the Depot Board.
- The Mammoth Tooth is placed on the Mammoth Field.
- HONGA Marker is placed in the center of the Game Board.
- The Player with the shaggiest hair will go first and gets the Starting Player Fire Marker, which they keep all game long. Starting with this Player, each Player will take a Gray Action Disk.
The game is ready to go, and when you use the diagram for the first time setup, things really do go nice and fast and are pretty logical to sort out. After seeing it the first time, our kids (ages 7 and 10) had no issues with setting up a game on their own without needing to look anything up.
Gameplay
One of the nice things about HONGA is that there’s a basic set of gameplay steps but a variety of choices that isn’t too overwhelming. The simplicity should not cause you to overlook the strategy aspect though. When it comes down to it, your goal is scoring points in a variety of ways, and if you aren’t careful, the other players may grab a lead that you have a harder time catching up to. In our game, we found that getting to draw the Red Action Disks tended to create a Resource Advantage that more easily converted to Victory Points later.
Player Turn
On a turn, Players do the following:

- Place an Action Disk on one of the round spaces so that the lines match up, you may rotate it how you like as long as the lines match up. Action Disks may be placed on top of each other.
- Determine if you must take HONGA.
- Carry out the actions designated by the Action Disk. The hands on the disk will point to an area you can interact with. The number of hands tells you how many times you can repeat the Action. Play any relevant Bonus Cards you may have from previous turns. A Player with possession of the Mammoth Tooth uses the Red Action Disks.
- Draw a new Action Disk and pass play off clockwise.
HONGA
When a Player sets down their Action Disk, a Space with a Hand must point to HONGA or HONGA joins you. When joining you, HONGA moves off the Player Board and onto the Player tray and will eat 1 resource. HONGA will eat a Fish First, if one is not available he moves down your Resources until there is something for him to eat. If you have no food but have a Mammoth on your Tray, he’ll eat the Mammoth (discarded Mammoths return to the Depot). The only way to get rid of HONGA is with an appropriate Bonus Card or if another Player sets down an Action Disk without a Hand pointing to HONGA’s space. If HONGA is still with you on your next turn, he eats another Resource or Mammoth.
Actions
The following Actions may occur on your turn depending on where the Hands on Your Action Disk are pointing:
- Collect Mushrooms: For each Hand pointing at the Mushrooms, you move your Mushroom Marker up one space on your Player Tray.
- Collect Berries: For each Hand pointing at the Berries, you move your Berry Marker up one space on your Player Tray.

- Fish in the Lake: For each Hand pointing at the Lake, you move your Fish Marker up one space on your Player Tray.
- Draw from the Spring: For each Hand pointing at the Spring, you move your Water Marker up one space on your Player Tray. You may also Trade 2 Waters for 1 Mushroom, Berry, or Fish.

A selection of Bonus Cards. Photo by Elizabeth MacAndrew. - Comb through the Thick Forest: For each Hand pointing at the Forest, you may draw a Bonus Card. You may look at the Bonus Cards but they cannot be played until your next turn. Place them face down near your Player Tray. You may only play 2 Bonus Cards in 1 turn. Used Bonus Cards go to the Discard Pile on the Depot Board.
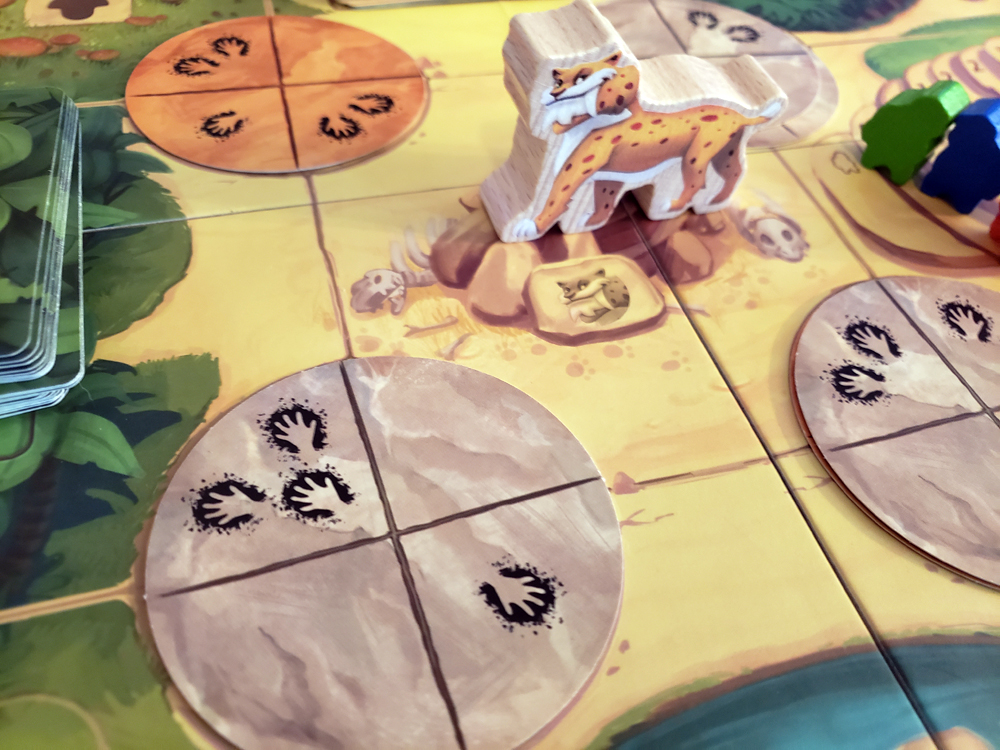
The Blue Player has the newest Mammoth and will gain control of the Mammoth Tooth. Photo by Elizabeth MacAndrew. - Attract Mammoths and obtain the Mammoth Tooth: For each Hand pointing at the Mammoth Field, you can trade a Fish, Berry, and a Mushroom for a Mammoth (simply move the Tokens down on your Player Tray to do this). Take a Mammoth from the Depot Board in your Color and put it in the spot above the Stone Table. When a new Mammoth is added, each Mammoth rotates to the spot to the left. The number of Players determines the maximum herd size. The spots have dots to show what is the last spot based on the Player number (for a 3 Player game, the spot has 3 dots). If your Mammoth would be bumped out, they are placed on your Player Tray. Whoever has the most Mammoths on the Mammoth Field gets the Mammoth Tooth and draws from the Red Action Card Deck (they even have a Mammoth Tooth on them) until another Player gets more Mammoths on the Field and claim the Mammoth Tooth. If there is a tie for the number of Mammoths on the Mammoth Field, the Player with the newest Mammoth on the Mammoth Field claims the Mammoth Tooth.

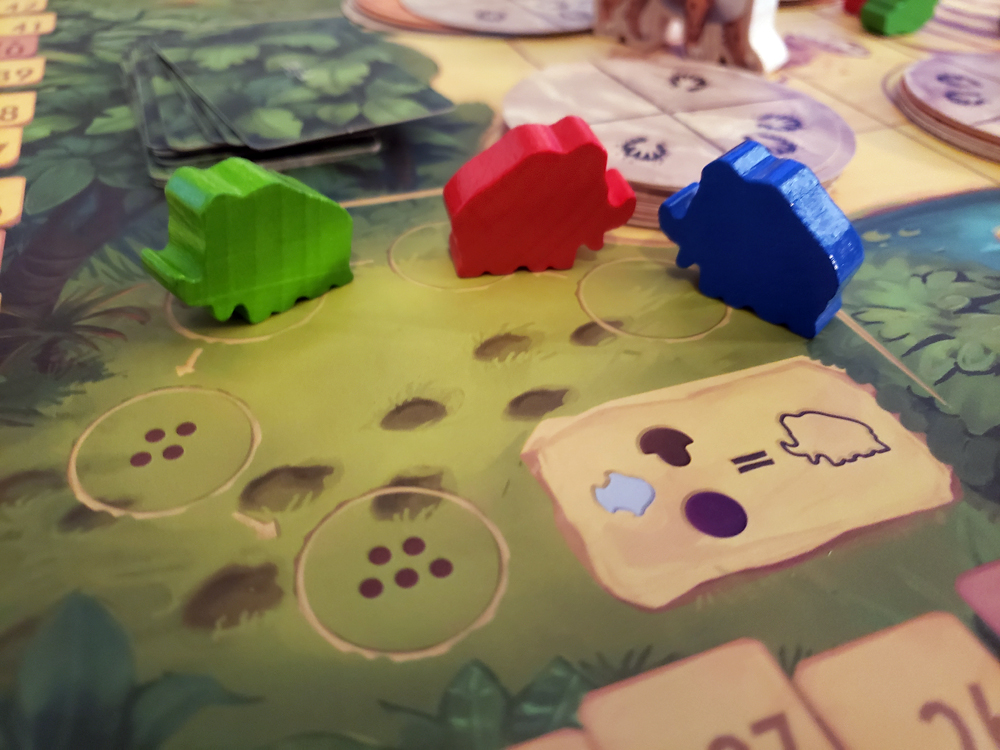
The Blue Player reached the top of the Sacred Mountain and scores 5 Victory Points. Photo by Elizabeth MacAndrew. - Pay homage to the Old Nature Gods: For each Hand pointing to the Sacred Mountain, your Caveman may move up a step. If a Caveman reaches the last step, that Caveman scores 5 Victory Points (move your Scoring Marker along the edge of the Game Board starting at the Cave). Each other Caveman gets the Victory Points that match the number on the step they are on, and then all Cavemen are returned to the bottom step.
-

This Player can Barter 4 Water for 3 Victory Points. Photo by Elizabeth MacAndrew. - Bartering with Foreign Clan Villages: For each Hand that points at a Bartering Space, you may select one of the face-up Barter Cards and make the trade indicated on it. Score your Victory Points, place the used Barter Card in the Discard Pile on the Depot Board, and replace a missing Barter Card with a new one from the Deck.
Game End

The game hits the final round when a Player reaches or surpasses the target number of Victory Points. This number varies by the number of Players and is noted by dots on the board (a 3 Player Game ends at 35 points so there are 3 dots on that space). The current round plays until it reaches the Starting Player. Unplayed Bonus Cards with Victory Points or unscored points from the Sacred Mountain are no longer valid once the round ends. The Player with the most Points is declared the winner (yes, someone can steal the win from whoever activated the final round). In case of a tie, whoever has the most Food remaining wins. The winner is now declared Chief of the Saber-Tooth Tiger Clan.
Why You Should Play HONGA
Like all of HABA’s titles that we’ve experienced, HONGA is a fun, well-designed game with truly excellent components. I am particularly pleased with the little details like indicators on the Game Board for spaces that correspond with how many players you have. The components match up well with the price range of the game, and I just love the careful thought put into them. Normally games in the $50 range are pretty complex, hence the price range, but HONGA’s instruction book broke it done fast enough that we got to playing pretty quickly, and that’s a big plus because kids can and will get impatient with long lists of rules.
Setup is super fast after the first time and the board helpfully outlines where a lot of the pieces go. My kids have busted it out after their initial play and needed zero help from me which is nice. Since the game can run a little longer to play for kids, quick setup is a nice balance.
I have grown increasingly fond of games where the turn has a few simple steps but there’s enough variety in those steps to create some interesting strategies. We did feel that getting control of the Mammoth Tooth earlier really helped gather enough resources to trade for Victory Points later. Our oldest kid, who won the game, also took advantage of the Sacred Mountain scoring and those points probably are what pushed him ahead to first place. Since you never know what pattern you’ll get on the Action Disks there’s just a streak of luck, but choosing to take or not take HONGA also creates an interesting challenge. HONGA steals resources, but if you have the Red Action disks, you might as well rotate the disks in a way that earns you extra stuff. This can wipe out the HONGA penalty and still pull you ahead if you’re clever about it. The game was easy enough to learn that our 7-year-old placed second and was able to play even if the recommended age is 8+, but I feel like it’s still complex enough that they won’t age out of it too fast which is nice given the price tag.
HONGA has an MSRP of $49.99 and can be bought via HABA (currently on sale for $39.99), Amazon ($39.99), or at your favorite local gaming store that carries HABA games.