“Sandworms. You hate ’em, right?”
Well, actually, they’re kind of weirdly nifty, and perfect for my last Tim Burton inspired project celebrating 25 years of The Nightmare Before Christmas.
This week, we’ll make a desktop item by collecting a sandworm specimen in a jar.
Since these projects were inspired by The Nightmare Before Christmas anniversary, we can also collect a tree-eating snake specimen unleashed as a “gift” by Jack Skellington in the movie.
For these projects, you’ll need:
• Black, white, and orange bakeable polymer clay
• Old jars or other glass containers
• Plain sand or a handful of kinetic sand (for the sandworm)
• Blue felt (for the snake)
•Silver chenille stems and red round beads (for the snake)
•Craft paint or felt tip markers
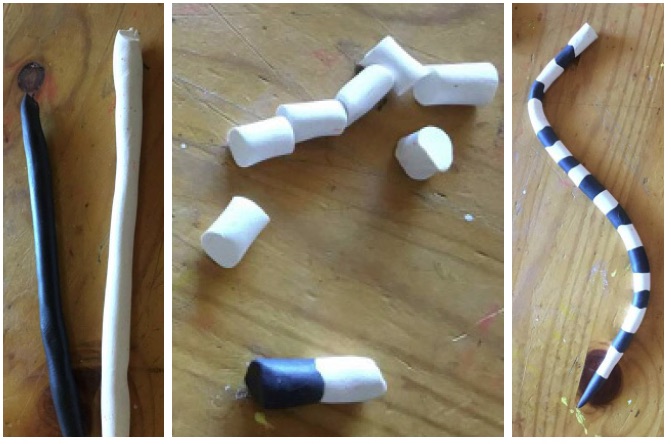
The Bodies: Make two easy polymer “snakes,” one white and one black (orange and black for the snake). Slice them into equal parts and place them in a tight line alternating the colors. Roll them gently together until they make a snaky line, tapering off one end for the tale. Put aside.
The Heads: Roll each in a “rosebud” formation to begin with. Use white for the two sandworm heads and orange for the snake. Lightly slice down the middle of each head to form a mouth.
For the inner sandworm head, use a toothpick on the inside of the mouth, to make some ridges, for the gums, then taper a few ends off for teeth. (You don’t have to get too detailed, as these are small heads.) Roll some white and black clay together, then roll into a tongue and place it in the mouth so it is sticking out.
For the outer sandworm head, make sure it is slightly bigger than the inner head, and place the inner head inside the open mouth. Make a few small cones for the teeth and place them in around the edge of the mouth.
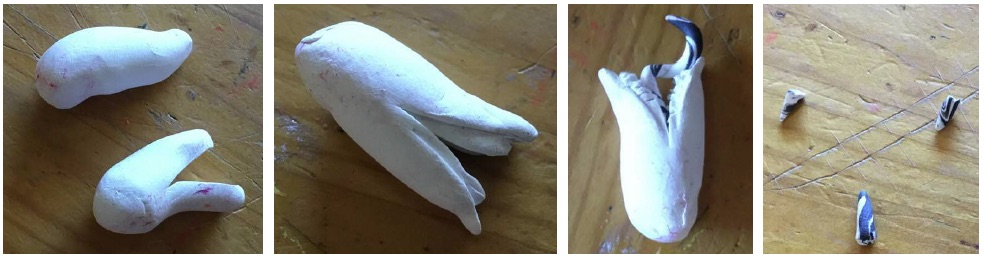
For the snake, make sure the mouth is opened wide because he’s going to be swallowing a tree later on.
Add eyes with little pony beads or paint them on after you bake them.
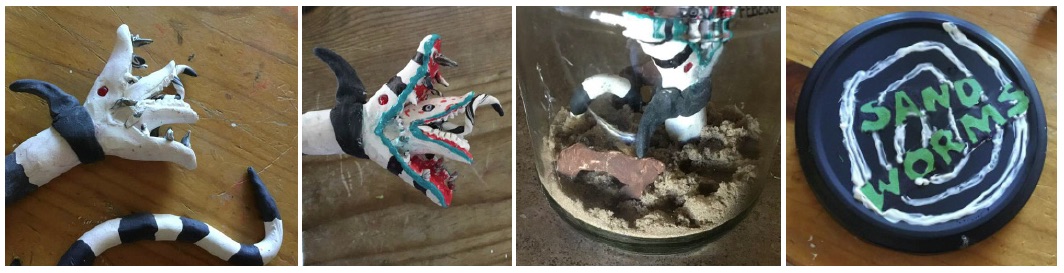
Attach the finished heads to the worm and snake. Cut the sandworm in half. Curve the snake so he is coiled enough to fit in the chosen jar or container.
If you want to make some of the weird rock formations seen in the sandworm’s world, roll some brown polymer in small tubes and bend them in random, asymmetrical shapes.
Bake the snakes according to the directions on the clay’s package. Paint any markings (lips, stripes, spots, etc.) after baking. The snake doesn’t need any additional paint.
To finish them off, glue the head piece and tail piece of the sandworm to the bottom of the jar so his head and tail are sticking up. Glue the ends of the rock formations (if you made them) to the bottom of the jar as well. Fill the bottom of the jar with sand, and place the lid on your specimen.
Finish the snake by gluing a piece of felt on the bottom of the jar. Glue a few silver stem pieces in the snake’s mouth to resemble the half-swallowed tree. Glue some red beads on the “branches.” Glue the snake into the jar.

Paint and label the lids to identify the beasties, and give keep them on a desktop or give them as a perfect creepy crawly gift.

For my other, larger Tim Burton projects, see my Haunted Mansion Jack scarecrow, Sleepy Hollow scarecrow, and paper lantern.