About 12 years ago, shortly after we had moved into a new home, we wanted to have something easy to set up each Halloween season that would not only look neat but also stand out from the mass-marketed cloaked drug store skeletons or expensive gore-centric animatronics. As big fans of the style of Tim Burton, as well as Disney’s Haunted Mansion, we decided to make our own little tribute to the familiar Jack the Pumpkin King Scarecrow perched prominently in the attraction’s queue during the Halloween season. From the pictures we’ve seen, he seemed easy enough.
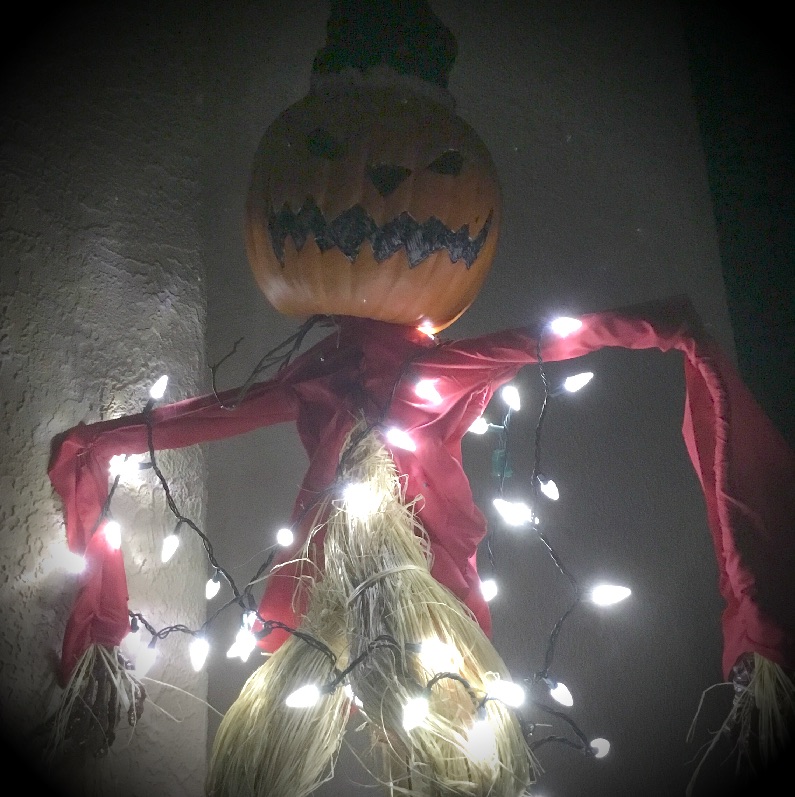
I built his body, arms, and legs from raffia, and tied them over a long bamboo pole. I tied the arms around a broom pole, and sewed a piece of red cloth around him for his coat, holding it together with red ribbon, of all things. I made the hands by wrapping clear packing tape around strands of the raffia for individual fingers, and carved his simple, basic face into a large craft pumpkin. I attached an old Santa hat to him with pipe cleaners and attached the pumpkin head to the body by setting in on top of the top of the bamboo pole, letting it rest on the arms I poked two holes in the back, and then I ran some more pipe cleaners through it to hold it in place.
We set the bamboo pole up on a large metal rod hammered into the ground, and haphazardly strung some outdoor lights over him. Since only the coat was holding the broomsticks in place, we could just fold up the arms and set him in a corner for storage. He didn’t look too bad at first, and he became a regular part of our home. After a few years of wind and weather, however, Jack began to get a little faded, droopy, and worn.

He started looking more forlorn than fearsome.
This year, with Tim Burton’s The Nightmare Before Christmas celebrating its 25th anniversary, I decided Jack deserves a little renovating.
Here’s a look at my troubleshooting process on how I helped help Jack become a better Pumpkin King for this and coming seasons:
The Body and Legs
When I first made Jack, I ran a long, thin bunch of raffia down a bamboo pole, and used some extra raffia to tie it to the pole where his pelvis would be. From there, I separated the raffia into two parts, tying each part with raffia at “the knee,” and tying them together at the ankles.
The problem: The legs would slip, didn’t hold their shape, and kept sliding down the pole.
My solution: I used pool noodles (which were exceptionally cheap at the end of the summer) and cut them the length I needed. I beveled the ends and cut a large wedge in the middle. This way, I could duct take them together in the middle to make some solid leg shapes that bent at the knee.

I taped the ends of the noodles on the bamboo pole where the body ends, and together where the “feet” would be. I pulled the raffia over them, and then I tied it to the noodles where the “knees” bend. This resulted in fuller-looking legs that will hold their shape.
The Arms and Hands
As I said in the description, I originally made Jack’s fingers out of more raffia, creating individual fingers by pulling tape around little pieces of it.
The problem: These would hardly show up and just dangled aimlessly.

The solution: Use plastic skeleton hands. Party stores, craft shops, and pop-up Halloween stores like Spirit all carry skeleton arms and hands sprayed the color of straw. Most of Jack’s arms will be covered with his coat, so the only raffia I would need would be a little tied around the wrist to give a more scarecrow-like look. These hands actually look like hands.
The Coat
Jack’s first coat was simply draped over arms and around the body and sewn in place with red thread.
The problem: It worked, but wasn’t very fashionable.
The solution: Actually cut a coat out first. I folded a yard of red cloth in half, and cut it in the shape of a “T” like the simple doll clothes kids learn to make at an early age. I cut a slit all the way up the front piece, so I could fold it over the arms before sewing it. I also shaped the back half a little to look like coattails.

Laying Jack on the floor on top of the coat, I folded it over the arms and stitched the coat arms on tightly around his arms. This helps hold the arms in place on the pole.
After sewing the front of the coat together, I took some thick, black twine and tied a criss-cross stitch like those used in shoelaces or corsets.
The Head and Hat
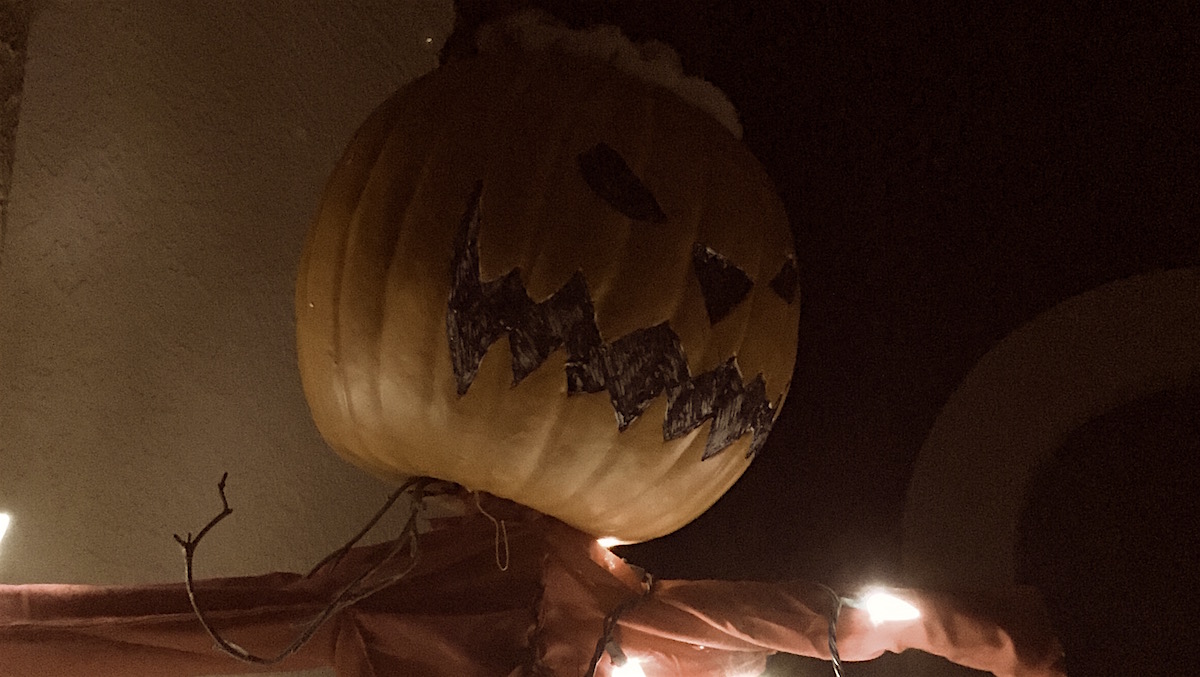
Carving the face in the craft pumpkin was the easy part, since Jack has the simple zigzag grin, semi-circle shaped eyes, and an upside-down triangle nose. I carved a small hole in the bottom to place it over the pole.
My problem: My original pipe cleaner holding the head steady wasn’t very steady at all. He would rock around and twist backward, in danger of falling off the pole completely. I had the same problem keeping the hat on his head, which never kept a nice shape.
The solution: I made the post go all the way through the pumpkin. Instead of a head flopping around on the top of a post, it’s good and spiked on there… like an orc’s battle trophy. The hat will cover the top of the post, so no one will be the wiser.
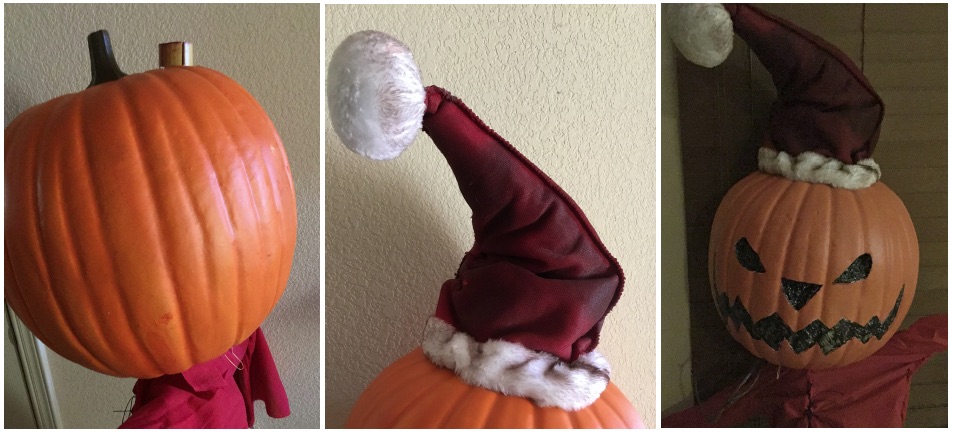
As for the hat, I filled it with wads of leftover cloth from Jack’s coat, as well as some paper packing material. This gives it a better shape. I also folded it over a little, and sewed a piece of red thread though the it to hold it in place. I attached the had to Jack’s head with a glue gun, and added a few hits from a staple gun around the edges. This should stand up well to the fall winds we get in the area.
This type of setup makes it easy the change out the pumpkin after a few seasons, as they well get cracked and weathered.
Now, Jack is ready to greet visitors, just like his old bony self again. After all, he is the Pumpkin King!

Next week: What I made with Jack’s “old” head.