

Children everywhere need to be children, something that seemed evident in the latest Star Wars universe installment Rogue One: A Star Wars Story.
Before helping bring hope to the Rebellion, Jyn Erso was a child. By describing Jyn’s childhood in the book Star Wars Rogue One: The Ultimate Visual Guide, author Pablo Hidalgo talked about the imagination of children.
“While her parents dealt with the grim adult matters of the Empire, young Jyn embarked upon flights of fancy fueled by a full toy box,” he wrote.
The collection of homemade wooden, metal and cloth toys pictured in the book, whether intentional or not, reveals the pioneer atmosphere of Jyn’s childhood, not unlike toys often seen in museums about early American settlers and agrarian cultures.
Among those toys, was her wooden Stormtrooper doll, seen briefly as Death Troopers look for a young Jyn early in the movie. We don’t see the doll again in the film, but learn from the visual guide she must have loved it enough to affectionately call him “Stormie.”

Unlike Rey’s little Rebel doll from Star Wars Episode VII: The Force Awakens, Jyn’s toys likely weren’t all built by her. Instead, they may have been homemade gifts from her parents, both of whom were clever and resourceful.
Back on Earth, we find ourselves surrounded by elaborate, wonderful toys and tech, but there is still something special about getting a one-of-a-kind item made by hand.
Christmas and the winter holidays, as well as the release of Rogue One, is a great time to celebrate the children in our own lives (and within ourselves), by making them their own wooden “Stormie.”
What you need:
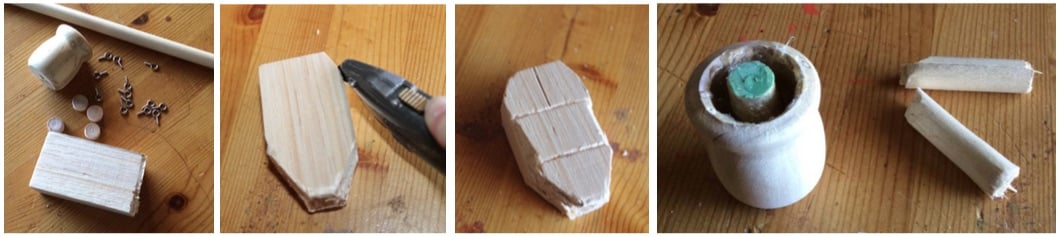
One Balsa wood block (about 3” x 1” x 1.5”)
One small wooden candle cup (about 1.5” high)
Four small “wood plugs” or wooden beads.
One wooden dowel (one-half inch by at least 15”)
One package of small screw eyes (14 are used in the craft, but it’s always a good idea to have extras on hand)
Carving Your Trooper
Take the balsa wood “torso,” and use a pencil to lightly draw lines across corners, longer at the bottom where the “legs” will go. Then, carefully slice off the corners, using a box cutter or other fine share blade, like a razor. If you’re kids are helping, I strongly caution against letting them do any of the cutting as even with balsa, blades must be sharp. Don’t use serrated blades, either, that will tear up the edges.
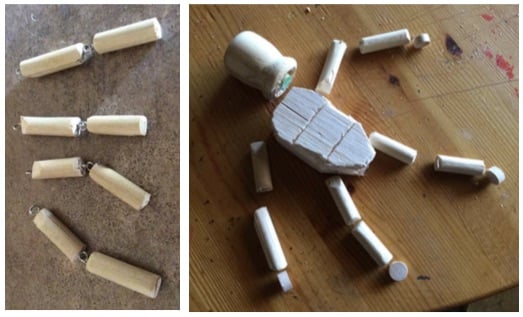
Use a regular pen or blunt pencil tip, and make the contours of “Stormie’s” chest and waist armor. You can use a blade to shape the edges of the armor a little bit, so he’s not overly “blocky”.
Make the arms and legs by sawing eight equal 2-inch pieces off the dowel. With a sharp blade, bevel one end of four of the pieces. Sand off all the ends, including the torso’s corners.
To keep the “carving” at a minimum, I used a candle cup for the helmet. It made my trooper’s helmet a little longer than the hand-carved one in the movie, but that’s the imperfect beauty of folk art. The only problem with using these, is the big, hollow opening at the bottom, so you’ll want to cut an additional small piece off the dowel, long enough to reach the end of the helmet’s base. Use a glue gun to hold it in place. You will need to fill the area around the dowel a least three–quarters full with the glue, but this will keep it in there nice and secure.
Adding The Joints
Next, give Stormie some arm and leg joints. This is where I veered from the original design of the toy, and used screw eyes to hold him together. Firmly screw in one of the eyes at each of the “hip” and “shoulder” corners of the torso block, and one more on the top, where the “neck” will go. Since you’re using balsa, make sure to secure these with superglue so they don’t pull right out of the body.
For the legs and arms, place a screw at each end of the “beveled” pieces, but at just one end of the other four pieces. Place one more screw at the end of the dowel piece in the helmet.
Painting Your Trooper
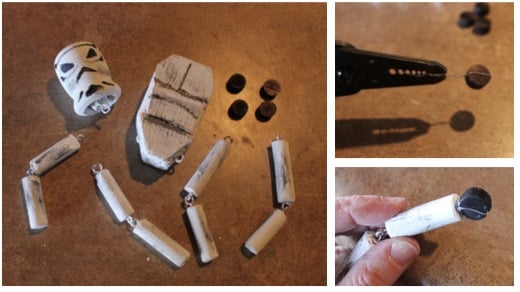
Now, paint your Stormie! Using spray paint might be easier, but I hand-brushed white acrylic craft paint to give him a more rustic, folk art feel. Paint the “hands and feet” (the wood plugs) black, and add details on the helmet and chest armor with black paint or felt tip marker. You can use the image for face ideas, but keep it simple, whatever you decide. I “dirtied” him up a bit with some light smudges of grey paint on throughout.
Add his hands and feet to the end of each of the four dowel pieces that have only one screw eye. To do this, I used strong crafting wire (found often with jewelry making items) and wrapped it around the little wood plug pieces. If using wood plugs, secure the wire in place it with a little superglue. You don’t need to do this if you use beads, since the wire can go through the hole, of course.
Twist the wire off at the end of each piece. Using a small screwdriver, drill bit or nail, make hole at the end of each of the four dowels that doesn’t have the screw. Place a small drop of super glue or glue gun in the hold and gently push the twisted wire end into the “wrist” and “ankle” ends of the trooper. Use a felt tip marker or paint to color the wire around the pieces black.
Linking Your Trooper
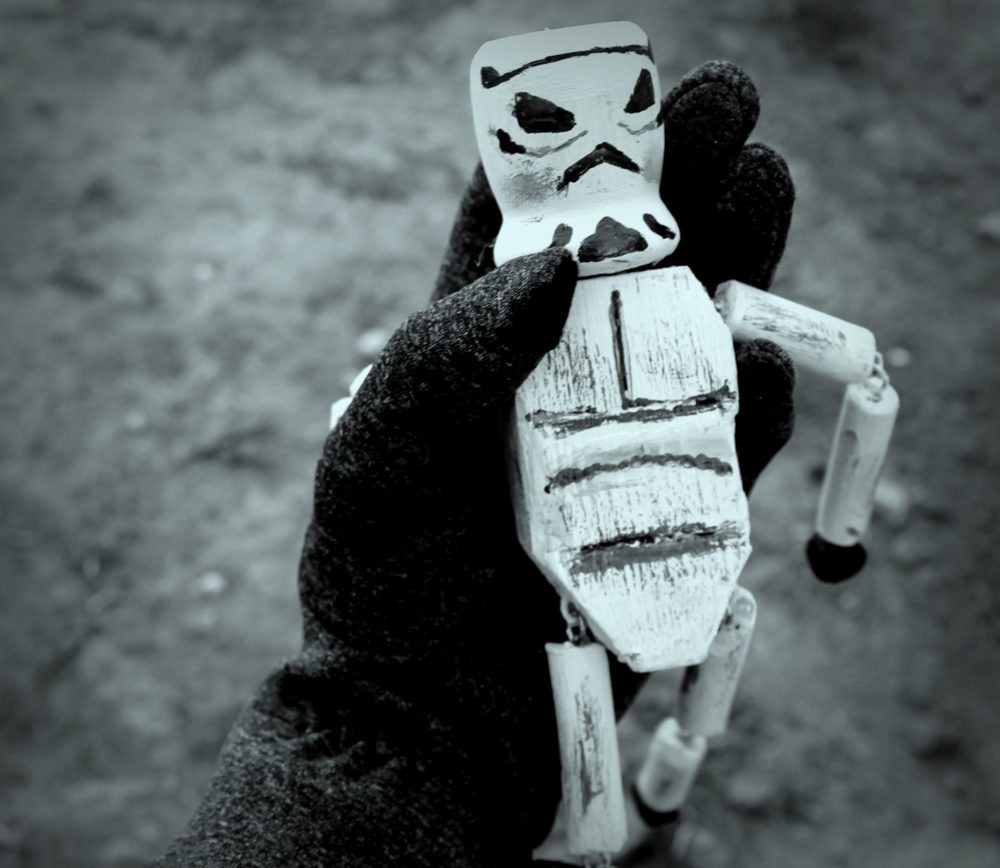
Finally, put him all together by linking the arm and leg pieces together, and then add to each corner of the torso. A pair of needle nose pliers will help you “open up” and close the screw eyes to link them.
Link the helmet to the top piece. Gently add a small amount of glue around the bottom of the helmet, and carefully push the helmet into the neck, to keep it secure.
Now Stormie is ready to surprise young Star Wars fans any time of year.
With 2016 coming to a close, it’s a good time to celebrate the hope, imagination, and playfulness of children everywhere, even in a galaxy far, far away.


hi, where did you get the linked eye hooks or did you connected them yourself? thanks
I got the hooks (with loops) at Home Depot, but any hardware store would have them.