

Gold West is an adventurous strategy game in which players strive to develop their own mining operation a la the American Gold Rush. Featuring a modular board and over 200 pieces, Gold West may seem overly complex. Happily, we found the mechanics to be easy and fair. Grabbing a willing group of players, we dug in for a long game.
Our first surprise was the sheer number of punch-out pieces. Token by token, we punched them out, taking several minutes just figuring out what each part of the game was. Cracking open the rulebook, we found the rules to be quite instructive, explaining the pieces clearly enough.
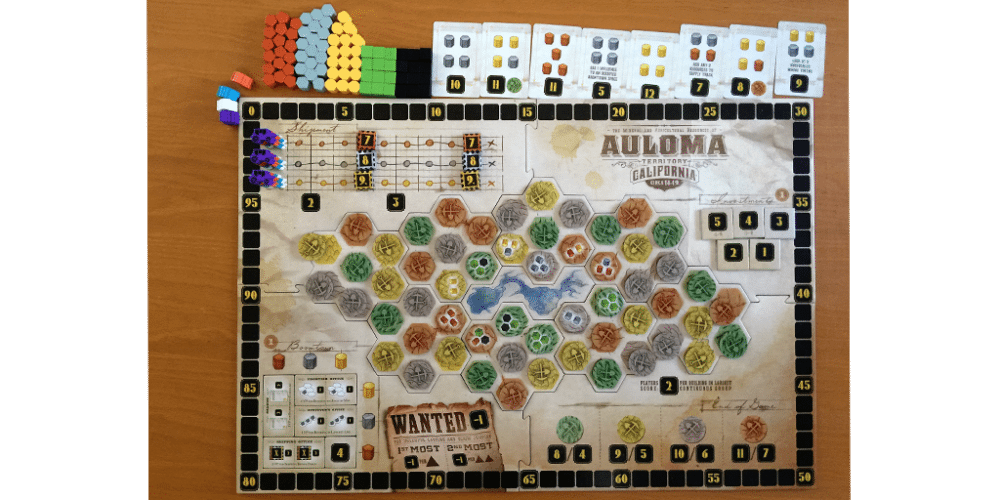
As you can see, the board is covered in dozens of pieces, with dozens more above.
Starting at the top left, you can see the materials players gather to build their outfits.
The metals are copper, silver, and gold. Next are wood and stone pieces. The rest of this row is made up of investments. The metals are the players’ currency, gathered each time. Metals are used for investments, shipping, and Boomtown for points. Wood and stone are used to build camps and settlements, which gain the player further resources and influence, which is scored at the end of the game.
Moving down, and returning to the left, you can see that each player has 4 scoring pieces. The four tokens standing to the side of the board are miners who progress around the board to keep score. The stagecoaches track the progress of your shipped materials, granting points as you go.
The center of the board is made up of the 8 modular hex boards, which are covered in matching mining tokens. The game starts with these tokens placed randomly on matching colors. At the beginning of the game, the tokens touching the water are flipped. These are the materials available at the beginning of the game. To the right of these are tokens labeled 1-5. These are score bonuses for completing the investments at the top of the board.
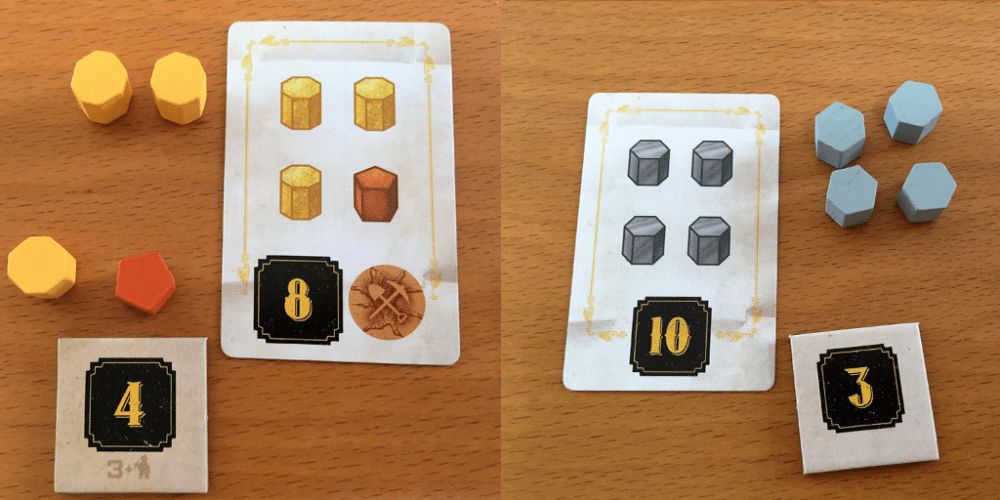
At the bottom left is Boomtown, a place to gain points by investing in the local market. There are 9 spaces. The number 4 is always present, but the other 4 two-space tiles are exchangeable. These tiles can be placed in a number of arrangements, meaning a great variety in scoring options and required materials.
To the right of Boomtown, the Wanted poster tracks misdeeds committed. When a player is unable to expand their operations, they must steal resources. Each time they steal resources, one of their tents is placed here, and the players with the most tents here at the end of the game lose points.
The last portion is the 4 scoring areas for influence, gained by building on the board, and tracked on the player card. Do note that this is the only place that shows the points for gaining the most influence in an area. These scores are not reflected in the rulebook.
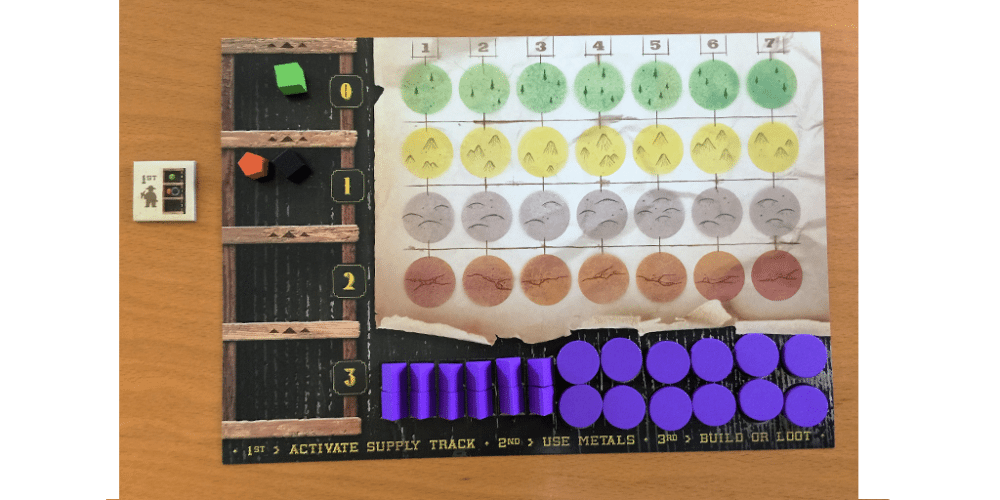
This is a player board, where resources are tracked for each player. Up to four players can play, each with their own board. On the left is the Supply Track, which allows the player to track the resources they’ve gathered. Each player starts with 3-4 pieces, represented on their player token. The first player is given 1 wood, 1 stone, and 1 copper to begin. To the right are the influence tracks. Each time the player builds a camp or settlement they will place a token on this track to show their progress. At the bottom, you can see the 12 camp pieces, shaped like little tents. Each camp gains the player influence on the above tracks. The 12 round tokens are for tracking influence in a number of ways.
Once we had our bearings, we were amazed at how easy Gold Rush was to play. I’ve even finished games while cooking! This is mostly thanks to the euro-style gameplay. With mechanics that don’t involve attacks or theft, each player is free to build with available resources, without being forced to save materials to fight off opponents.
Now let’s go through a few turns, and I can show you the mechanics, which are great fun.
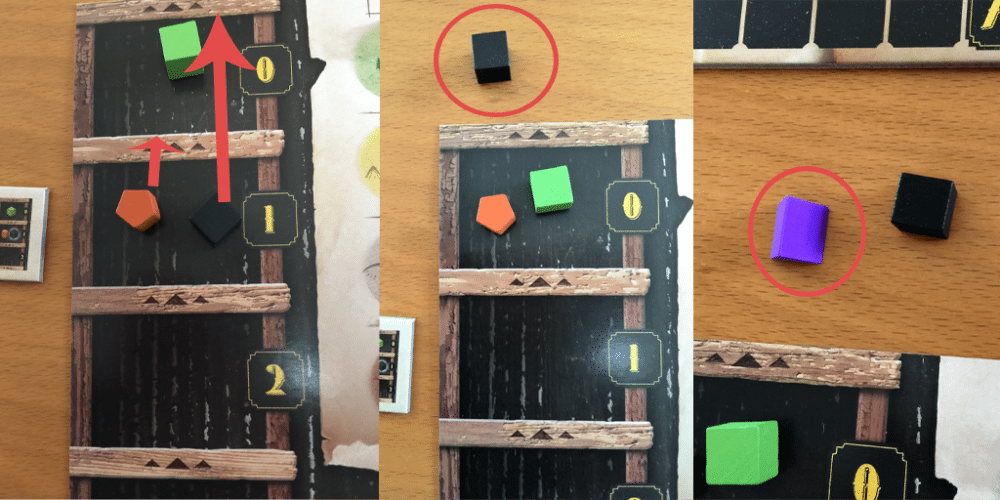
On the first turn, our player, Alpha, has her 3 materials in her supply track. Electing to take pieces from the 1-point bin, she moves them upward, in a Mancala-style trail. She moves her copper into the 0-point bin, and the stone all the way out. Now she has 1 stone in the usage area. Since she has no metals, she proceeds to the next step. She spends the stone to build a camp, which is marked with a little tent.
Here you can see the space she has decided to claim. She replaces the green token with her tent and takes the token. The token grants her 2 stone and 1 wood. She places them in the 1-point bin, gaining 1 point for doing so. She places the green token on her green influence track.

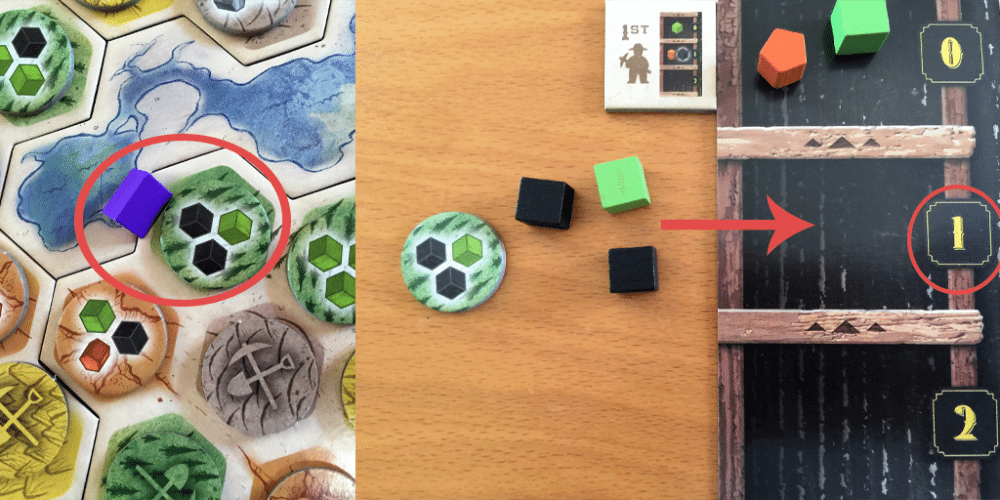
In her second turn, Apha must evaluate the best way to prevent waste. She elects to move each resource in her 1-point bin up. Again, in a Mancala-style move, she leaves a stone in the 0-point bin and brings 1 stone and 1 wood into the usage area. For the second time, she has no metals, so she skips to the building stage. With 1 wood and 1 stone, she is able to build a settlement. These work the same as camps but are worth 2 influence, rather than the usual 1.

She places the settlement next to her original tent. Notice, as she expands, adjacent materials are revealed. She gains 3 wood and chooses to put them in the 2-point bin, gaining 2 more points on the scoring track.
The most difficult part was learning how to score. Every minor mechanic leads to points in some way, creating a “salad” score system. Scores can be hard to predict, but once you have the rhythm down, it goes much more smoothly.

Here you can see Alpha’s influence track. On her first turn, she built a camp, and her second turn a settlement. This gives her a total of 3 influence. One space is left blank to show that a settlement is counted there.
Now that you know the basics, let’s look at investments. Any turn that delivers metals into the usage area allows the player to spend the metal as they choose. The first way metals can be spent is investments. By spending the appropriate resources, a player completes an investment. They take the card, and an investment bonus, if any remains. On the leftmost investment, you can see a copper mining symbol. This means the player may advance their influence in that resource by 1 space. Investments are the fastest and most direct way to score large numbers of points.

When a player doesn’t have enough metals to invest, they can spend 2 metals to place an influence token on Boomtown. Each space scores a little differently. The 4 space always grants the player an immediate 4 points. Others grant points at the end of the game for a variety of feats, including points per each investment, camp, settlement, and more.

When a player has fewer (or more) materials than they need to invest or build in Boomtown, they can ship their metals. Their stagecoach moves forward 1 for each material they ship. At certain thresholds, players gain points for going past. The first and second players to pass the tokens, though, take a token for its points. Following players don’t get points for passing those spaces.

The above image is a representation of one game’s influence for all players. Normally, each card only has a single player’s influence. In the above image, I’ve put them all on one card to show how the scoring ended in this game. I used influence tokens to differentiate each player’s progress.
- In the green track, we can see that the white, blue, and orange players each gained 1 influence. The purple player, however, gained a total of 5 investments, including 2 settlements. Purple gains 8 points and the other three players split the points for second, rounded down, 1 point each.
- In the gold track, we can see that white gained only 1 influence and blue 2 influence. Orange has the lead with 6 orange, so they get 9 points. Purple, as second, gains 5 points. Blue and white gain 0 points.
- In the silver track, Purple comes in first, gaining 10 points. Blue gains 6. Orange and white gain 0 points.
- In the copper track, white has the lead, gaining 11 points. Blue snares the 7 points for second place.
Tasty Minstrel Games suggests 2-4 players, but I prefer it most with 2. The more players one has, the more chaotic it feels and the longer the game takes. That said, any number of players works quite well.
The game is advertised to take 45-60 minutes. With 2 players, we can finish under 30 minutes, but with 4 the full hour is needed. I’d generally say that 45-60 minutes is a fair assessment–unless you have players with analysis paralysis.
Finally, TMG suggests ages 13+. I find this to be a bit conservative. The fastest game I’ve played was with a 12-year-old, and kids as young as 10 can easily play, especially if they’re used to complex board games.
TLDR: Gold West is a great game with dynamic play and scoring that changes from game to game. Players of many ages will enjoy play between 30-60 minutes. Gold West is best for 2-4 players who enjoy strategy games without attacks or defenses.


