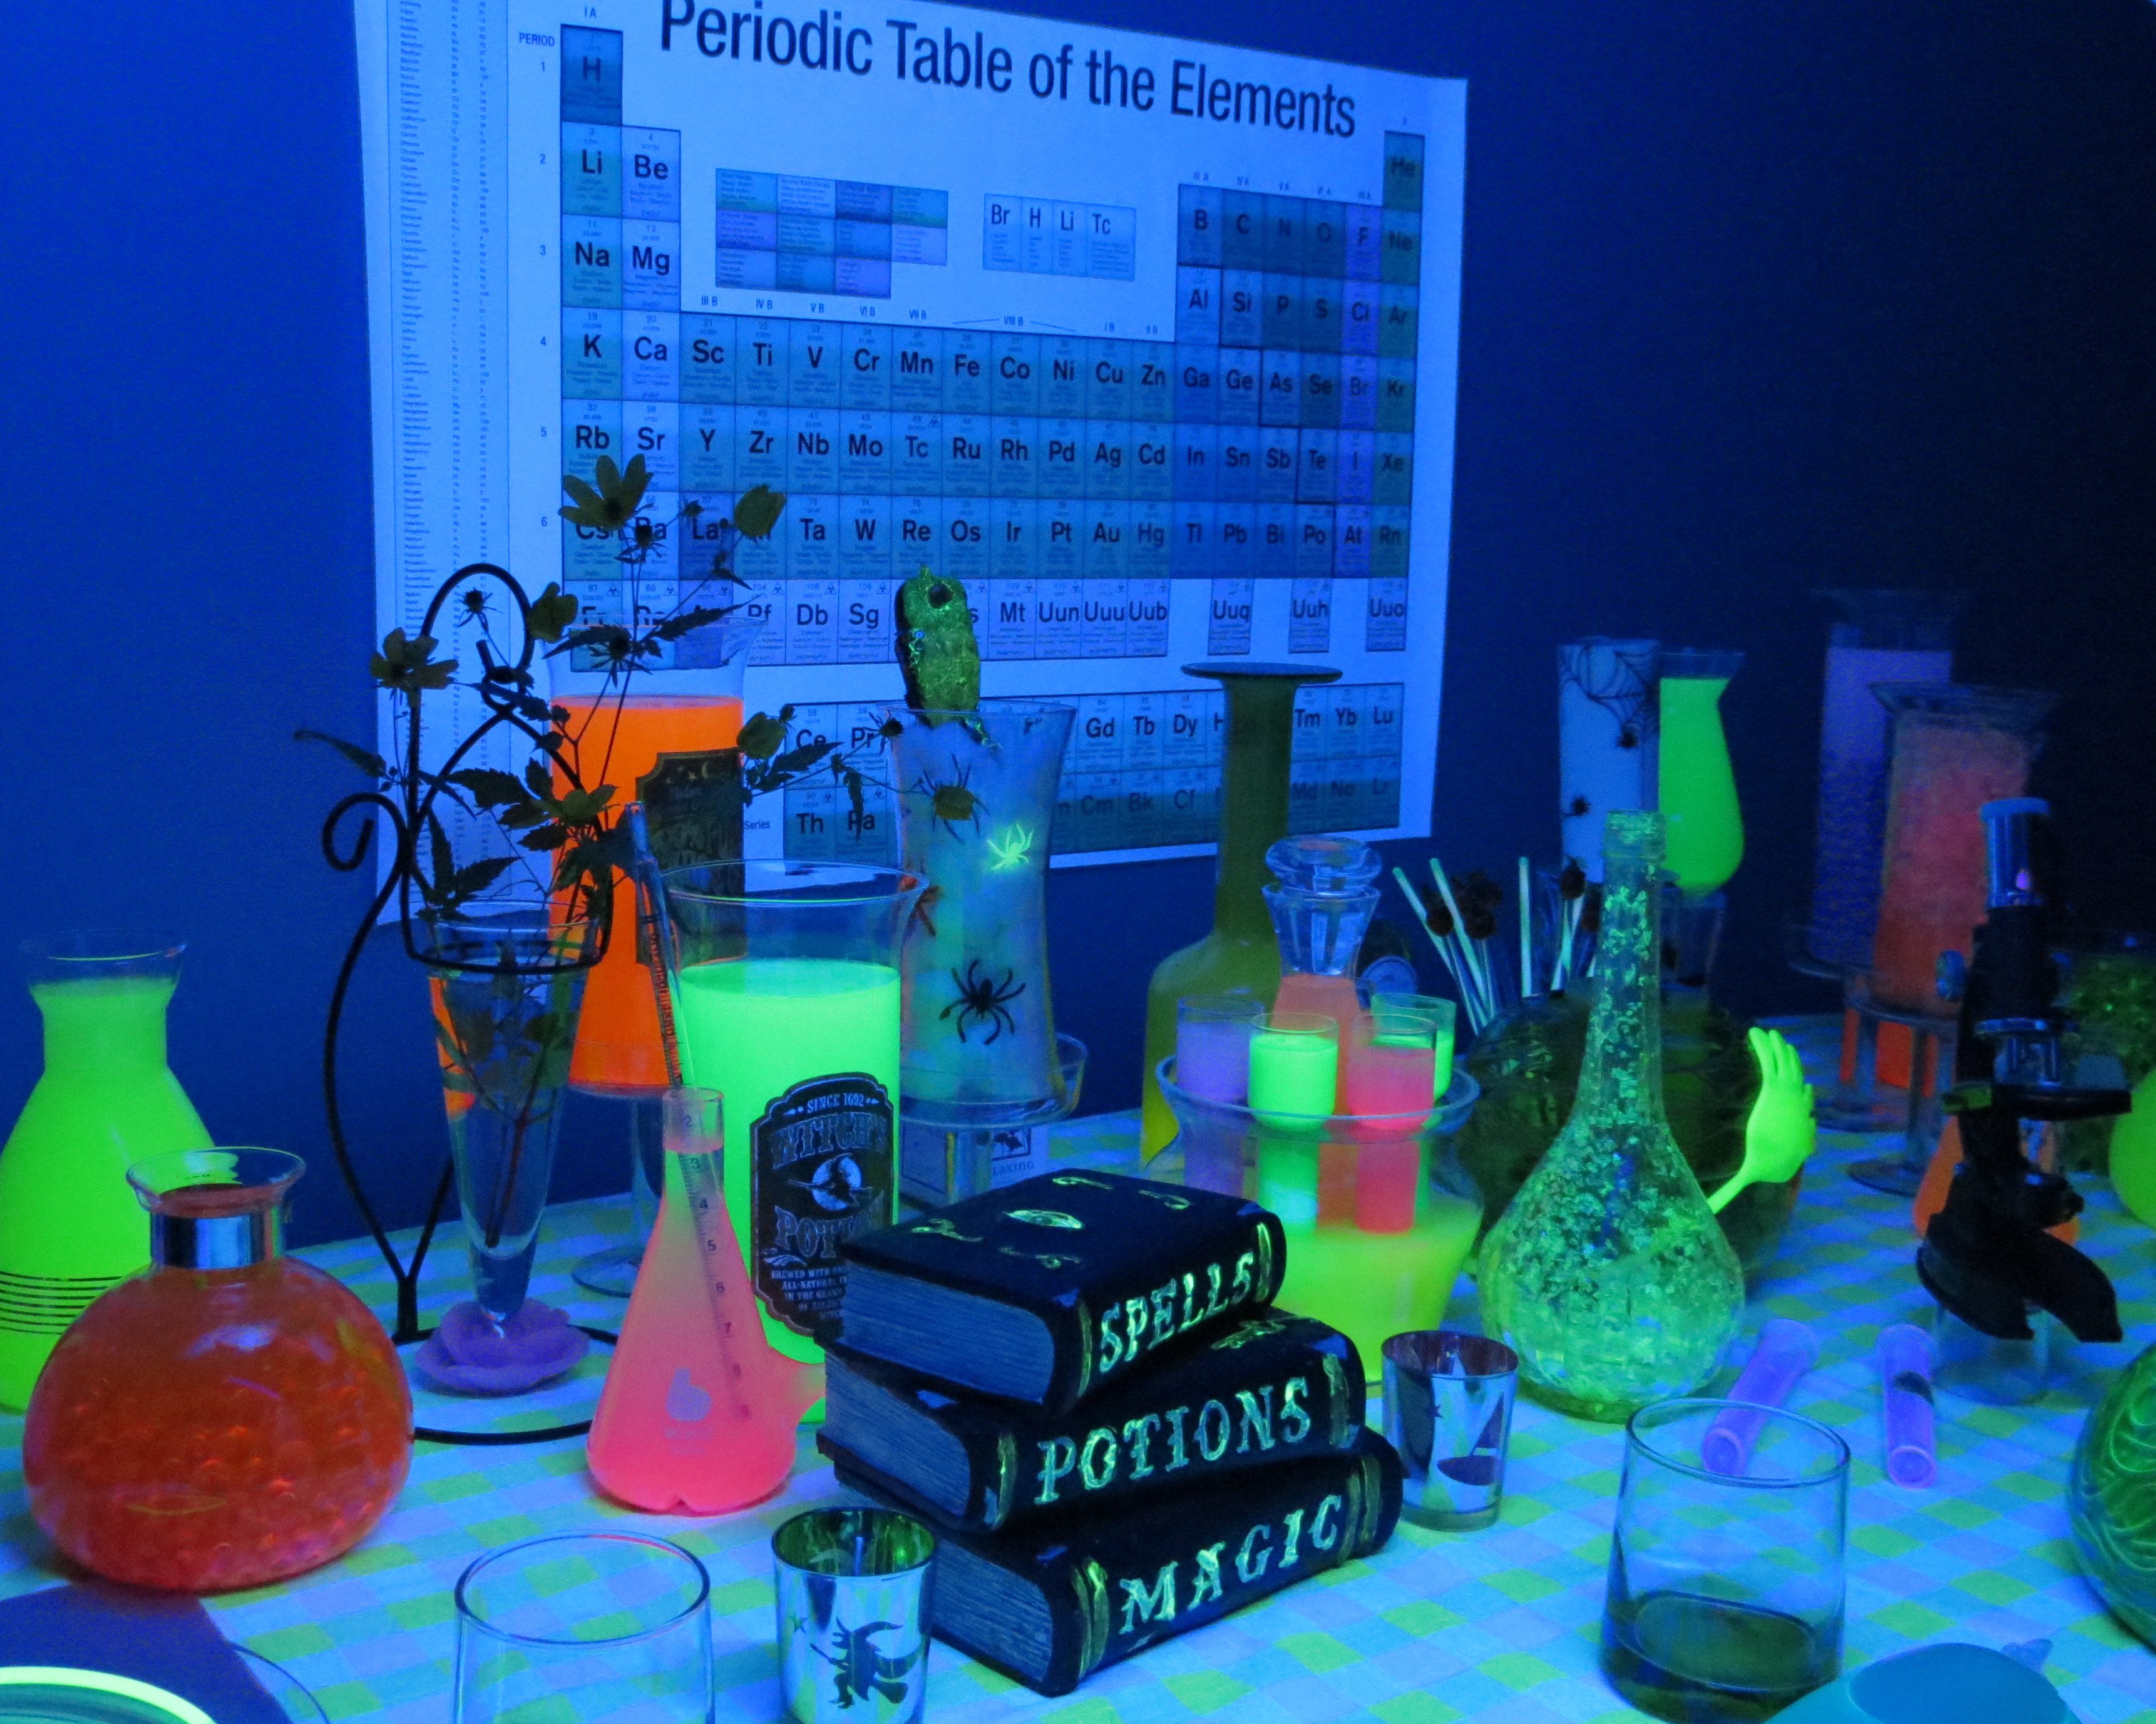

Looking for something eye catching and spooky for your Halloween decor this year? Maybe a Mad Scientist tablescape is just the right thing for you!
It all started when GeekMom Natalie sent me a link to a fantastic tablescape from Pottery Barn featuring a periodic table. The gears in my mind immediately started turning as I wondered how I could do something similar in my own home and on a budget. Recently, I started creating a new tablescape on my kitchen table each month, and I decided to concoct a chemistry-themed tablescape for October and Halloween.
Choosing the Glass
I knew I needed some spooky chemistry glass, and I thought my local thrift store would be a great place to start looking. Let’s face it, I’m a thrift-store-aholic with my favorite being the non-profit Guardian Angel in Fuquay-Varina, NC, which raises money to fund Alzheimer’s research. I wasn’t disappointed with what I found in their “Vases” section. I just about danced in the isle as I filled my cart with amazing glass finds!

For $20, I walked away with the majority of glassware that I thought I would need to fill up my kitchen table. I would love to have used real chemistry Pyrex glass, but after pricing some beakers and flasks, they were way over my budget with each piece being $5 or more. I decided that vases with a flared outer rim at the top would work best. Luckily, they had quite a few of those. I felt the rim disguised the vases enough so that they didn’t look like they were for flowers. I also realized that coffee pots with the handles removed did a great job of simulating real flasks. Most of the clear glass was in the $1-$2 price range. Quite reasonable for my budget.

Making the Labels
Next I did a lot of research on Halloween bottle labels and created a Potion Bottle Labels board on Pinterest. I was going to make my own bottle labels, but I ended up ordering some glow-in-the-dark labels from Amazon and Oriental Trading Company. I decided that I wanted the glow-in-the-dark look and the ease of application of the store bought labels. Maybe I’ll make my own next year!
Getting Just the Right Bottle Glow
I also needed to figure out what to fill my bottles with so that they would look great in daylight and also under a blacklight. I created a Halloween Chemistry board on Pinterest as I did my research. What I found out is that there are quite a few options for getting liquid to glow. To summarize, you can use glow sticks, highlighter pens, tonic water, and neon paint, to name a few techniques.
I decided to go with neon paint because I thought it would be the least expensive and least toxic. This is the same paint kids use in preschool to fingerpaint. Just make sure you get neon colors. To make a bottle glow with the paint, just squeeze in several tablespoons of paint, add tap water, and stir.

I tried this special blacklight paint for the purple and pink, but it was not as bright under the blacklight as the neon paints that I used. Next time I would just get neon pink and neon purple paint.

Picking Some Other Elements
So what other items did I think would look good on the table and complement the glass? I pulled out my microscope which I thought would fit right in. I also found a ceramic piece shaped like a stack of books labeled “Spells,” “Potions,” and “Magic” at Michaels that I figured would be a perfect addition to the table. I used a few candles and to fill one of the glass jars with cotton balls and plastic, glowing spiders. I picked up a sparkling, tiny owl to clip onto one of the glass jars too. I also included a small sprig of the yellow wildflower tickweed, currently growing near my home. I got the idea to put green food color tinted water into plastic medical gloves for a spooky hands effect. And, I created a creepy brain by filling one of my larger bowls with cooked spaghetti and green food tinted color water. I picked up some ping pong ball style eyeballs too. I didn’t want my table to be too gory, but I just couldn’t resist the eyeballs. Last but not least, I used some Water Beads. Have you ever used those in a vase? They are so much fun to look at and play with! My kids can’t get enough of them. Check out this post by GeekMom Cathé where her daughter does an interesting experiment with water beads. Just make sure to put your water beads in water 4+ hours before you’re ready to debut your table or take pictures of it. The beads need some time to absorb water and grow bigger.

I spent a long time hunting for just the right periodic table of elements poster. I wanted the largest poster I could find for the cheapest price; I also needed it sooner rather than later. I ended up buying one off eBay for $10, and I was pleased with it.
Laying Out the Table Foundation
Before you can start laying out your table, you need to decide if you want to use a tablecloth, and what placemats, napkins, plates, and even silverware you want to use. I ended up using a green and white checkered piece of fabric that I found in the attic for the tablecloth. I had two orange and black checkered tablecloths, but I decided against them because I felt they would be too dark when I had the blacklight on. I knew that I wanted purple placemats and couldn’t find any locally, so I used rectangles of purple felt. That left me looking for just the right napkins. Walmart has some pre-cut rectangular fabric pieces in their craft department, and I picked up a pack of various patterns all with a purple and green theme to tie the tablecloth and placemats together. The fabric is pretty easy to fold like a napkin.

For daytime use, I decided to stick with my Country Cottage and Melissa (green and white checker) Corelle plates, but at night, I decided to go with clear plates that I could light up with necklace size glow sticks
.


Assembling the Table
When I had gathered all the items I wanted to use, and on the day I was ready to assemble the table, I started out by filling one bottle at a time with the paint and water mixture and placing it on the table. I repurposed a few margarita glasses as risers so that the glass could be displayed at varying heights. I saved a few of the bottles for the water beads, and mixed them up, and placed them on the table too. And most importantly, I enlisted help from the kids who were very excited about the project.


Once you have the bottles laid out in a way that makes you happy, you can add the other elements such as bottle labels, ribbons, flowers, etc. Just keep adding elements, adjusting the layout, and tweaking things until you are satisfied. There is no right or wrong with this. Just have fun!

Checking the Blacklight
I was very pleased with how the table lit up the first time I put the blacklight on it, but there were a few items that didn’t light up. The owl and the “Spells,” “Potions,” and “Magic” books ceramic piece were just as dark as could be. I scratched my head for a minute and decided to try painting them with some glow-in-the-dark dimensional fabric paint that I had lying around. The paint is pretty transparent and easy to apply, so you don’t have to be an expert painter to make this work. Just get a small brush, and apply a thin layer of the paint to anything you’d like to have glow.

In just a few minutes, my “Spells,” “Potions,” and “Magic” books ceramic piece went from being black and obscure to being one of the most eye catching items on my table!

I just love how this turned out and couldn’t imagine my table without it! I almost wish I had more items that I could have painted with the glow-in-the-dark paint.
Getting the Most Out of Your Glow Sticks
Although I avoided using the chemicals inside glow sticks to make the majority of my bottles glow, I ended up with one glow stick that broke open accidentally while we were snapping it to make it glow. Instead of throwing it away, I wanted to put it to good use. I had some large and somewhat see-through Glitter Flakes that I poured into a teardrop-shaped bottle. Then I added all the liquid from inside the glow stick. I used an old, but sharp, steak knife to open the glow stick plastic enough to get all the chemicals out. Sometimes you can use scissors, but many of the plastic tubes are too thick to cut easily. Whatever you use, be careful not to cut yourself and to thoroughly wash your hands when you’re done. Otherwise you can have a lesson in how germs spread in your home by turning off your lights and seeing where all the little hands have touched with the glow chemicals. To finish, put the cap on the bottle, our hold your thumb over the opening, and shake up the glitter and liquid. You’ll be amazed at the results!

Remember those jars of fireflies you collected as a kid? Well, your glowing glitter bottle will look very similar! Bottles lit up this way are truly mesmerizing to view. Since glow sticks only glow for a limited amount of time, bottles prepared this way will only look this beautiful for one evening. However, if you want to light the bottle up again, say the next night, you can always just add the contents of one more glow stick and a bit more of the glitter flakes.

Explaining Fluorescent and Phosphorescent
All the kids I’ve ever spent time with are fascinated by things that glow in the dark after being charged under a light or by things that glow under a black light. When I turned on the black light over my table for the first time, my boys were amazed at how it lit up. I even got lucky, and the tablecloth glowed. Another way to include your kids in setting up this tablescape is to take a few minutes to talk about why things glow under various conditions. Take the time to explain the difference between items that are fluorescent versus phosphorescent.
Taking Your Pictures and Sharing Your Result
Make sure to take some pictures to save all your efforts for posterity. I took many shots with the light on and using my flash.


I also took a bunch of pictures with the lights off and the blacklight on. I used a stick-style blacklight and my guy held it for me as I took the pictures, but you could also put a black light into your dining room table light fixture or a lamp (freestanding or tabletop). I used a tripod to keep my camera still, but you can keep your camera still by leaning on your kitchen counter or against a doorframe. The Auto setting on your camera will probably work just fine as long as the camera is still.


Feeling inspired to create your own chemistry-themed Halloween table? You can get some more ideas by checking out my Halloween Tablescape board on Pinterest. I’ve seen some tablescapes that make use of beautiful natural light and various types of foliage from your yard. There are others that gore up the items filling their bottles. You can use traditional Halloween black and orange colors if you like. Or maybe you’d like to have an old manual typewriter that the Mad Scientist can type up his research notes on. If the Mad Scientist gets hot in his lab, an old, black metal fan might be just the prop to add to your table. A black chalkboard could be just the thing for the Mad Scientist to write up his notes on. The Mad Scientist might even have some old tools and scissors for working on his experiments and patients. How about the perfect old clock? Set your creativity free, and see what you can come up with!

Love this, especially the glow element!
I love it!
Amazingly fun!!! Thank you