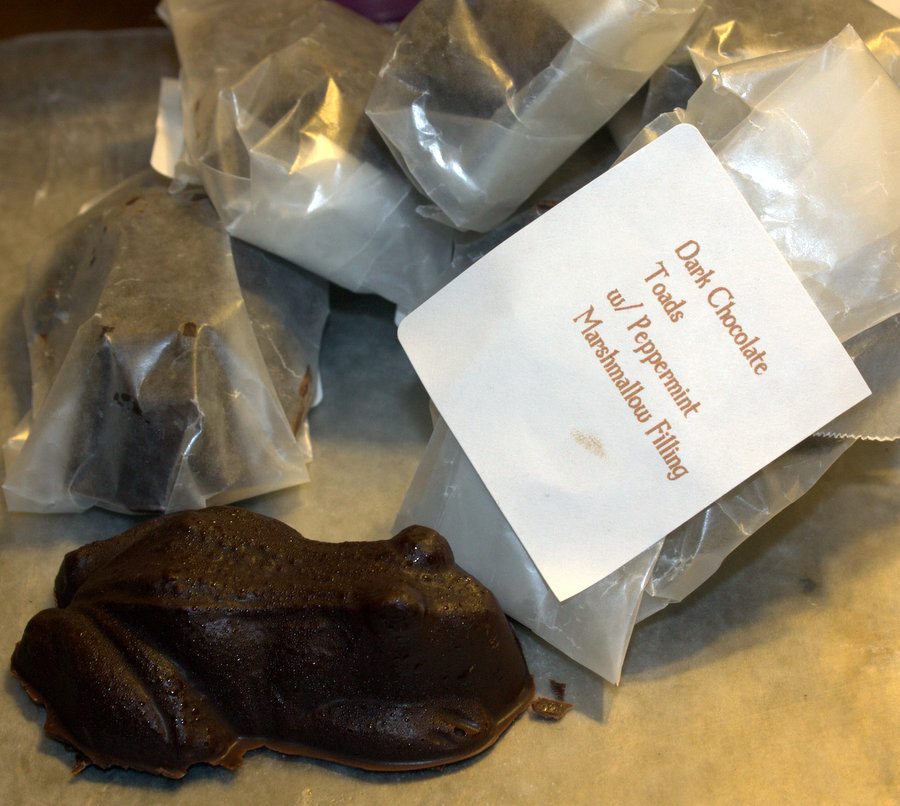

My daughter recently had a Harry Potter themed birthday party. The festivities of the day are for another article, but part of the Honeydukes gift bags were homemade Peppermint Toads.
My husband and I are foodies. Why do something food related halfway when you can do it right? This includes candy recipes that call for those Wilton flavored discs that are used as candy coating. Why make candy if you are going to use those?
I (by “I” I mean the standard Better Homes & Gardens New Cookbook) finally found a recipe that makes a decent procedure for tempering chocolate so it can stand up to coating a mold.
Posts’ Peppermint Toads:
Other Equipment:
Chocolate:
- 6 oz of chocolate pieces (semisweet, milk chocolate, take your pick)
- 1tbs shortening (I used butter flavor to give the “feel” of creamier chocolate but the choice is yours)
In the microwave: on a high setting alternate 30 seconds of heating and stirring of the ingredients until the chocolate is evenly melted and smooth.
On the stove: if you do not wish to use a microwave, mix the ingredients over a double-boiler on medium heat until smooth and evenly melted.
Start your Toads!: once the chocolate coating is to a smooth consistency, spoon your chocolate coating down the sides of your toad mold. Swirl the mold in a circular motion to help coat all of the crevices. Make sure to not use all of your chocolate so there is enough to put bottoms on the toads later. After you coat your candy mold with a generous layer of chocolate, stick it in the freezer to harden while you work on the marshmallow.

Marshmallow:
We used a recipe for marshmallow we found on Instructables. We made a few changes though.
We found the full batch of marshmallow was too much. When we attempted to make a second batch of toads we had to re-soften the marshmallow, which heated it to the point that it melted the chocolate and hardened so that when a chunk fell out of the bowl onto the mold we had a huge mess (but later there was a cool factor as some of the toads that had been roughed-up had “guts” coming out of them). Needless to say, this recipe is for a half batch.
- 1 1/4 tbsp plain gelatin
- 1/4 cup cold water
- 3/4 cup sugar
- 1/2 cup light corn syrup
- 1/8 tsp salt
- 1/4 cup water
- 1/2 tbsp vanilla
- 1/2 tsp peppermint extract
1. In a stand mixer bowl, combine the gelatin and 1/4 cup cold water in the mixing bowl. It is important to do this first so it can sit and gelatinize. This process takes about fifteen minutes regardless of the size batch of marshmallow you are making.
2. In a saucepan, combine sugar, corn syrup, salt and 1/4 cup of water over low heat, stirring until sugar dissolves.
3. Once the sugar is dissolved, turn the heat up to high and stick in a candy thermometer. All you need to do is watch the thermometer, don’t stir the solution. When the temperature is between 242 and 248 degrees Fahrenheit, you can remove it from the heat. This process should take around ten minutes.
4. Remember the stand mixer bowl you put the gelatin in? It’s time to use it. Set up your mixer and turn it on low speed. Slowly add the sugar mixture to the gelatin. When all of the sugar is added, increase the speed (over the course of a minute or so) to the highest setting . When you get to the highest setting, watch the mixture blend until it has doubled or tripled in size (while you are waiting, you can grab the cooled toad mold from the freezer). The marshmallow should have a thin, stretchy, and sticky consistency. Without turning down the speed, add your vanilla and peppermint and then shut the mixer off.
5. Working quickly, spoon the marshmallow mixture into your pastry bag. Using a medium to wide tip, slowly add a dollop of marshmallow to each of the toads in your mold attempting not to disturb the chocolate (since the marshmallow will still be warm or hot) and being careful to only fill the mold most of the way (leaving room to top off with more chocolate).
6. Stick the toad mold back in the freezer (if you are having problems with melting, this is optional), and remelt the chocolate. When the chocolate is smooth (and again easily spoon-able), retrieve your toads from the freezer and finish filling each with chocolate so that it is even and not overflowing. If the candies do overflow, it is easy enough to cut off excess with a knife later.

7. Put in the refrigerator overnight. After they have set, gently pop the toads out of their molds and wrap as you like.
These were a really big hit at our Harry Potter party. Now that we know what we are doing, I would happily make them again. Do you have a favorite Harry Potter confection?


Toads with guts oozing out never looked so appealing. What an awesome party favor.
When we had a Harry Potter party we made several confections as well as butterbeer. The biggest hit wasn’t the games, it was a line-up we’d made of vials with tags like Unicorn Tears, Wart Juice, etc. Each vial had a dropper and each kid had a tiny bottle with a cork. They could choose drops of different magical liquids to make their own potions, which they named and labeled. Then they described the potion’s power. They really got into it.
That’s awesome! I love the potions class part of Harry Potter parties. Everyone always comes up with the coolest stuff. Wart Juice is a new one…what did you use for that?